
 sign in
 join
join
OWIN OAuth 2.0 권한 부여 서버
- 본 번역문서의 원문은 OWIN OAuth 2.0 Authorization Server www.asp.net 입니다.
본 자습서에서는 OWIN OAuth 미들웨어를 이용해서 OAuth 2.0 권한 부여 서버를 구현하는 방법을 살펴봅니다. 본문은 따라하기 방식의 단계별 자습서가 아니라, OWIN OAuth 2.0 권한 부여 서버를 만들기 위한 전반적인 과정들을 살펴보는 고급 수준의 자습서입니다. 예제 코드 다운로드 받기.
소프트웨어 버전
| 자습서에 사용된 버전 | 그 밖에 동작하는 버전들 |
|---|---|
| Windows 8.1 | Windows 8, Windows 7 |
| Visual Studio 2013 |
Visual Studio Express 2013 for Web.
또는 최신 업데이트가 설치된 Visual Studio 2012를 사용할 수도 있지만, 자습서 내용이 테스트 되지는 않았으며, 일부 메뉴 선택 항목이나 대화 상자의 모습에 차이가 존재할 수도 있습니다. |
| .NET 4.5 |
질문 및 의견
본 자습서와 직접적으로 연관되지 않은 질문은 http://katanaproject.codeplex.com/discussions에 올려주시기 바랍니다. 그리고 자습서 자체에 대한 질문 및 의견은 원문 페이지 하단의 의견(Comments) 절을 이용해주시기 바랍니다.
OAuth 2.0 프레임워크를 이용하면 서드-파티 응용 프로그램이 특정 HTTP 서비스에 대해 제한적인 엑세스 권한을 얻을 수 있습니다. 클라이언트는 리소스 소유자의 자격 증명을 사용해서 보호되고 있는 리소스에 접근하는 대신, 특정 범위와 수명, 그리고 그 밖의 접근 속성들을 담고 있는 문자열을 얻게 되는데 이 문자열을 액세스 토큰이라고 합니다. 액세스 토큰은 리소스 소유자의 승인 하에 권한 부여 서버를 통해서 서드-파티 클라이언트에게 발급됩니다.
본 자습서에서는 다음과 같은 내용들을 살펴봅니다:
- 권한 부여 및 토큰 갱신을 지원하는 권한 부여 서버를 구현하는 방법
-
권한 부여 코드 허가:
- 암시적 허가
- 리소스 소유자 비밀번호 자격 증명 허가
- 클라이언트 자격 증명 허가
- 액세스 토큰으로 보호되는 리소스 서버 구현하기
- OAuth 2.0 클라이언트 구현하기
전제조건
- 페이지 상단의 소프트웨어 버전 항목에 설명된 것과 같은 Visual Studio 2013 또는 무료 Visual Studio Express 2013.
- OWIN에 대한 기본적인 이해. Getting Started with the Katana Project 및 What's new in OWIN and Katana 등의 기사들을 참고하시기 바랍니다.
- 역할(Roles), 프로토콜 흐름(Protocol Flow), 권한 부여 허가(Authorization Grant) 같은 OAuth 용어에 대한 이해. OAuth 2.0 프레임워크 문서의 Introduction 절에 잘 소개되어 있습니다.
권한 부여 서버 구현하기
본 자습서에서는 OWIN과 ASP.NET MVC를 이용해서 권한 부여 서버를 구현하는 전반적인 방법을 대략적으로 살펴봅니다. 그러나 모든 과정들을 하나씩 꼼꼼하게 살펴보지는 않기 때문에, 가급적 빠른 시일 내에 완성된 전체 예제 코드를 다운로드 받을 수 있도록 제공해드리고자 합니다. 먼저 AuthorizationServer 라는 이름으로 빈 웹 응용 프로그램을 생성하고 다음의 패키지들을 설치합니다:
- Microsoft.AspNet.Mvc
- Microsoft.Owin.Host.SystemWeb
- Microsoft.Owin.Security.OAuth
- Microsoft.Owin.Security.Cookies
- Microsoft.Owin.Security.Google (또는 Microsoft.Owin.Security.Facebook 등 다른 임의의 소셜 로그인 패키지)
그리고 프로젝트의 루트 폴더에 Startup 이라는 이름으로 OWIN 시작 클래스를 추가합니다.
using Microsoft.Owin;
using Owin;

[assembly: OwinStartup(typeof(AuthorizationServer.Startup))]

namespace AuthorizationServer
{
    public partial class Startup
    {
        public void Configuration(IAppBuilder app)
        {
            ConfigureAuth(app);
        }
    }
}
계속해서 이번에는 App_Start 폴더를 생성합니다. 그리고 App_Start 폴더를 선택한 상태에서 Shift+Alt+A 키를 눌러서 다운로드 받은 버전의 AuthorizationServer\App_Start\Startup.Auth.cs 파일을 추가합니다.
public void ConfigureAuth(IAppBuilder app)
{
    // Enable the Application Sign In Cookie.
    app.UseCookieAuthentication(new CookieAuthenticationOptions
    {
        AuthenticationType = "Application",
        AuthenticationMode = AuthenticationMode.Passive,
        LoginPath = new PathString(Paths.LoginPath),
        LogoutPath = new PathString(Paths.LogoutPath),
    });

    // Enable the External Sign In Cookie.
    app.SetDefaultSignInAsAuthenticationType("External");
    app.UseCookieAuthentication(new CookieAuthenticationOptions
    {
        AuthenticationType = "External",
        AuthenticationMode = AuthenticationMode.Passive,
        CookieName = CookieAuthenticationDefaults.CookiePrefix + "External",
        ExpireTimeSpan = TimeSpan.FromMinutes(5),
    });

    // Enable Google authentication.
    app.UseGoogleAuthentication();

    // Setup Authorization Server
    app.UseOAuthAuthorizationServer(new OAuthAuthorizationServerOptions
    {
        AuthorizeEndpointPath = new PathString(Paths.AuthorizePath),
        TokenEndpointPath = new PathString(Paths.TokenPath),
        ApplicationCanDisplayErrors = true,
#if DEBUG
        AllowInsecureHttp = true,
#endif
        // Authorization server provider which controls the lifecycle of Authorization Server
        Provider = new OAuthAuthorizationServerProvider
        {
            OnValidateClientRedirectUri = ValidateClientRedirectUri,
            OnValidateClientAuthentication = ValidateClientAuthentication,
            OnGrantResourceOwnerCredentials = GrantResourceOwnerCredentials,
            OnGrantClientCredentials = GrantClientCredetails
        },

        // Authorization code provider which creates and receives the authorization code.
        AuthorizationCodeProvider = new AuthenticationTokenProvider
        {
            OnCreate = CreateAuthenticationCode,
            OnReceive = ReceiveAuthenticationCode,
        },

        // Refresh token provider which creates and receives refresh token.
        RefreshTokenProvider = new AuthenticationTokenProvider
        {
            OnCreate = CreateRefreshToken,
            OnReceive = ReceiveRefreshToken,
        }
    });
}
이 코드에서는 권한 부여 서버 자체적으로 계정을 관리하기 위해 사용되는 응용 프로그램 및 외부 로그인 쿠키와 Google 인증을 활성화시키고 있습니다.
그리고 UseOAuthAuthorizationServer 확장 메서드는 권한 부여 서버를 설정하는데, 그 설정 옵션은 다음과 같습니다:
-
AuthorizeEndpointPath: 클라이언트 응용 프로그램이 토큰이나 코드 발급에 대한 사용자의 허가를 얻기 위해서 사용자 에이전트를 재전송해야 할 요청 경로입니다. 이 경로는 "/Authorize"처럼 슬래시 문자로 시작해야 합니다. -
TokenEndpointPath: 클라이언트 응용 프로그램이 엑세스 토큰을 얻기 위해서 직접 통신하는 요청 경로입니다. 이 경로 역시 "/Token"처럼 슬래시 문자로 시작해야 합니다. 클라이언트에 client_secret이 발급되면 이 끝점에 제공되어야 합니다. -
ApplicationCanDisplayErrors: 웹 응용 프로그램에서/Authorize끝점의 클라이언트 유효성 검사 오류에 대해 사용자 지정 오류 페이지를 출력하려면true로 설정합니다. 이 옵션은client_id나redirect_uri가 부정확한 경우처럼 브라우저가 클라이언트 응용 프로그램으로 다시 재전송되지 않는 경우에만 필요합니다./Authorize끝점은 "oauth.Error" 속성과 "oauth.ErrorDescription" 속성, 그리고 "oauth.ErrorUri" 속성이 OWIN 환경 사전에 추가됐을 것으로 간주합니다.노트: 이 옵션을 true로 설정하지 않으면, 권한 부여 서버는 오류 상세 정보와 함께 기본 오류 페이지를 반환합니다. -
AllowInsecureHttp: 권한 부여 및 토큰 요청을 HTTPS URI 주소가 아닌 HTTP URI 주소로 전달 받을 수 있고,redirect_uri권한 부여 요청 매개변수에 HTTP URI 주소를 설정할 수 있도록 허용하려면true로 설정합니다.보안 노트: 이 옵션은 개발 환경에서만 사용해야 합니다. -
Provider: 권한 부여 서버 미들웨어에 의해서 발생하는 이벤트들을 처리하기 위해 응용 프로그램에서 제공되는 개체입니다. 응용 프로그램은 인터페이스를 완벽하게 구현하거나,OAuthAuthorizationServerProvider의 인스턴스를 생성한 다음 서버가 지원하는 OAuth의 흐름에 필요한 대리자들만 할당할 수도 있습니다. -
AuthorizationCodeProvider: 클라이언트 응용 프로그램에 반환할 일회용 권한 부여 코드를 생성합니다. OAuth 서버의 보안을 유지하기 위해서는OnCreate/OnCreateAsync이벤트에 의해서 생성된 토큰이 반드시 단 한 번의OnReceive/OnReceiveAsync호출에 대해서만 유효한 것으로 간주하는AuthorizationCodeProvider의 인스턴스를 응용 프로그램에서 제공해야 합니다. -
RefreshTokenProvider: 필요한 시점에 새로운 액세스 토큰을 생성하기 위해 사용할 수 있는 리프레시 토큰을 생성합니다. 이 옵션이 제공되지 않을 경우, 권한 부여 서버는/Token끝점에서 리프레시 토큰을 반환하지 않습니다.
계정 관리
OAuth는 사용자 계정 정보를 어디서 어떤 방식으로 관리하는지에 대해서는 관심이 없습니다.
그 역할을 담당하는 것은 ASP.NET Identity입니다.
본 자습서에서는 사용자가 OWIN 쿠키 미들웨어를 이용해서 로그인 할 수 있도록 간단한 계정 관리 코드만 구현해봅니다.
다음은 간결하게 정리한 예제 AccountController의 코드입니다:
public class AccountController : Controller
{
    public ActionResult Login()
    {
        var authentication =  HttpContext.GetOwinContext().Authentication;
        if (Request.HttpMethod == "POST")
        {
            var isPersistent = !string.IsNullOrEmpty(Request.Form.Get("isPersistent"));

            if (!string.IsNullOrEmpty(Request.Form.Get("submit.Signin")))
            {
                authentication.SignIn(
                    new AuthenticationProperties { IsPersistent = isPersistent },
                    new ClaimsIdentity(new[] { new Claim(
                        ClaimsIdentity.DefaultNameClaimType, Request.Form["username"]) }, "Application"));
            }
        }

        return View();
    }

    public ActionResult Logout()
    {
        return View();
    }

    public ActionResult External()
    {
        var authentication = HttpContext.GetOwinContext().Authentication;
        if (Request.HttpMethod == "POST")
        {
            foreach (var key in Request.Form.AllKeys)
            {
                if (key.StartsWith("submit.External.") && !string.IsNullOrEmpty(Request.Form.Get(key)))
                {
                    var authType = key.Substring("submit.External.".Length);
                    authentication.Challenge(authType);
                    return new HttpUnauthorizedResult();
                }
            }
        }
        var identity = authentication.AuthenticateAsync("External").Result.Identity;
        if (identity != null)
        {
            authentication.SignOut("External");
            authentication.SignIn(
                new AuthenticationProperties { IsPersistent = true },
                new ClaimsIdentity(identity.Claims, "Application", identity.NameClaimType, identity.RoleClaimType));
            return Redirect(Request.QueryString["ReturnUrl"]);
        }

        return View();
    }
}
private Task ValidateClientRedirectUri(OAuthValidateClientRedirectUriContext context)
{
    if (context.ClientId == Clients.Client1.Id)
    {
        context.Validated(Clients.Client1.RedirectUrl);
    }
    else if (context.ClientId == Clients.Client2.Id)
    {
        context.Validated(Clients.Client2.RedirectUrl);
    }
    return Task.FromResult(0);
}

private Task ValidateClientAuthentication(OAuthValidateClientAuthenticationContext context)
{
    string clientId;
    string clientSecret;
    if (context.TryGetBasicCredentials(out clientId, out clientSecret) ||
        context.TryGetFormCredentials(out clientId, out clientSecret))
    {
        if (clientId == Clients.Client1.Id && clientSecret == Clients.Client1.Secret)
        {
            context.Validated();
        }
        else if (clientId == Clients.Client2.Id && clientSecret == Clients.Client2.Secret)
        {
            context.Validated();
        }
    }
    return Task.FromResult(0);
}
이 예제 코드에서 ValidateClientRedirectUri 메서드는 클라이언트와 해당 클라이언트에 대해 등록된 재전송 URL의 유효성을 검사합니다.
그리고 ValidateClientAuthentication 메서드는 기본 스킴 헤더와 폼 본문을 검사해서 클라이언트의 자격 증명을 얻습니다.
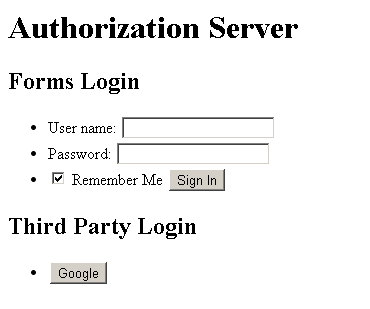
로그인 페이지의 모습은 다음과 같습니다:
계속해서 이번에는 IETF의 OAuth 2 Authorization Code Grant 절을 검토해보겠습니다.
다음 표에서 공급자(Provider)는 OAuth 서버의 모든 이벤트들을 포함하고 있는 OAuthAuthorizationServerProvider 형식의 OAuthAuthorizationServerOptions.Provider를 말합니다.
| Authorization Code Grant 절에서 설명하고 있는 흐름의 단계 | 다운로드 받은 예제 코드에서 해당 단계를 수행하는 부분들 |
|---|---|
| (A) 클라이언트가 권한 부여 끝점에 리소스 소유자의 사용자 에이전트를 전송함으로써 흐름을 시작합니다. 이 때 클라이언트는 클라이언트의 식별자, 요청 범위, 로컬 상태 및 엑세스가 허가(또는 거부)됐을 때 권한 부여 서버가 다시 사용자 에이전트를 재전송시킬 URL을 함께 전달합니다. |
Provider.MatchEndpoint Provider.ValidateClientRedirectUri Provider.ValidateAuthorizeRequest Provider.AuthorizeEndpoint |
| (B) 권한 부여 서버는 (사용자 에이전트를 통해서) 리소스 소유자를 인증하고, 리소스 소유자가 클라이언트의 액세스 요청을 허가하거나 거부했는지 여부를 설정합니다. |
<사용자가 엑세스를 허가한 경우> Provider.MatchEndpoint Provider.ValidateClientRedirectUri Provider.ValidateAuthorizeRequest Provider.AuthorizeEndpoint AuthorizationCodeProvider.CreateAsync |
| (C) 만약 리소스 소유자가 엑세스를 허가했다면, 권한 부여 서버가 기존에 (요청 중 또는 클라이언트 등록 과정에서) 제공된 재전송 URI를 이용해서 사용자 에이전트를 다시 클라이언트로 재전송합니다. | |
| (D) 클라이언트가 이전 단계에서 발급 받은 권한 부여 코드를 이용해서 권한 부여 서버의 토큰 끝점에 엑세스 토큰을 요청합니다. 요청 과정 중, 권한 부여 서버를 통해서 클라이언트가 인증됩니다. 이 때 클라이언트는 권한 부여 코드를 얻기 위해 사용되는 재전송 URI를 검증을 위해 함께 포함시킵니다. |
Provider.MatchEndpoint Provider.ValidateClientAuthentication AuthorizationCodeProvider.ReceiveAsync Provider.ValidateTokenRequest Provider.GrantAuthorizationCode Provider.TokenEndpoint AccessTokenProvider.CreateAsync RefreshTokenProvider.CreateAsync |
권한 부여 코드의 생성 및 유효성 검사를 제어하기 위해 구현된 AuthorizationCodeProvider.CreateAsync 메서드와 ReceiveAsync 메서드의 예제 코드는 다음과 같습니다.
private readonly ConcurrentDictionary<string, string> _authenticationCodes =
    new ConcurrentDictionary<string, string>(StringComparer.Ordinal);

private void CreateAuthenticationCode(AuthenticationTokenCreateContext context)
{
    context.SetToken(Guid.NewGuid().ToString("n") + Guid.NewGuid().ToString("n"));
    _authenticationCodes[context.Token] = context.SerializeTicket();
}

private void ReceiveAuthenticationCode(AuthenticationTokenReceiveContext context)
{
    string value;
    if (_authenticationCodes.TryRemove(context.Token, out value))
    {
        context.DeserializeTicket(value);
    }
}
여기에서는 코드 및 신원 티켓을 저장했다가 코드를 전달 받은 뒤에 다시 신원을 복원하기 위해서 인-메모리 ConcurrentDictionary<TKey, TValue> 클래스를 이용하고 있습니다. 그러나 실제 응용 프로그램에서는 이런 방법 대신 영구적인 데이터 저장소를 이용하는 것이 권장됩니다.
권한 부여 끝점은 리소스 소유자가 클라이언트의 엑세스를 허가하기 위한 용도로 사용됩니다.
일반적으로 이 과정에는 사용자의 허가를 확인하기 위해 버튼을 클릭할 수 있는 사용자 인터페이스가 필요합니다.
OWIN OAuth 미들웨어를 사용하면 응용 프로그램의 코드에서 권한 부여 끝점을 처리할 수 있습니다.
본문의 예제 응용 프로그램에서는 OAuthController라는 이름의 MVC 컨트롤러를 이용해서 이를 처리하고 있습니다.
다음은 구현된 예제 코드입니다:
public class OAuthController : Controller
{
    public ActionResult Authorize()
    {
        if (Response.StatusCode != 200)
        {
            return View("AuthorizeError");
        }

        var authentication = HttpContext.GetOwinContext().Authentication;
        var ticket = authentication.AuthenticateAsync("Application").Result;
        var identity = ticket != null ? ticket.Identity : null;
        if (identity == null)
        {
            authentication.Challenge("Application");
            return new HttpUnauthorizedResult();
        }

        var scopes = (Request.QueryString.Get("scope") ?? "").Split(' ');

        if (Request.HttpMethod == "POST")
        {
            if (!string.IsNullOrEmpty(Request.Form.Get("submit.Grant")))
            {
                identity = new ClaimsIdentity(identity.Claims, "Bearer", identity.NameClaimType, identity.RoleClaimType);
                foreach (var scope in scopes)
                {
                    identity.AddClaim(new Claim("urn:oauth:scope", scope));
                }
                authentication.SignIn(identity);
            }
            if (!string.IsNullOrEmpty(Request.Form.Get("submit.Login")))
            {
                authentication.SignOut("Application");
                authentication.Challenge("Application");
                return new HttpUnauthorizedResult();
            }
        }

        return View();
    }
}
먼저 Authorize 액션은 사용자가 권한 부여 서버에 로그인 했는지 여부를 확인합니다.
만약 사용자가 로그인을 하지 않았다면 인증 미들웨어는 "Application" 쿠키를 지정하고 로그인 페이지로 재전송시켜서 호출자의 인증을 시도합니다 (위의 강조된 코드 부분 참조).
반면 사용자가 로그인 된 상태라면 다음과 같은 Authorize 뷰를 렌더하게 됩니다:
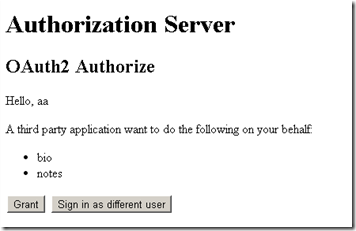
그리고 이 화면에서 Grant 버튼이 눌려지면, Authorize 액션이 새로운 "전달자(Bearer)" 신원을 생성하고 이를 이용해서 로그인을 수행합니다.
그 결과, 권한 부여 서버가 전달자 토큰(Bearer Token)을 생성하고 JSON 페이로드에 담아서 클라이언트로 다시 전송하게 됩니다.
암시적 허가
이번에는 다시 IETF의 OAuth 2 Implicit Grant 절을 검토해보겠습니다.
그림 4에서 볼 수 있는 암시적 허가(Implicit Grant)의 흐름은 OWIN OAuth 미들웨어의 흐름과 다음과 같이 매핑됩니다.
| Implicit Grant 절에서 설명하고 있는 흐름의 단계 | 다운로드 받은 예제 코드에서 해당 단계를 수행하는 부분들 |
|---|---|
| (A) 클라이언트가 권한 부여 끝점에 리소스 소유자의 사용자 에이전트를 전송함으로써 흐름을 시작합니다. 이 때 클라이언트는 클라이언트의 식별자, 요청 범위, 로컬 상태 및 엑세스가 허가(또는 거부)됐을 때 권한 부여 서버가 다시 사용자 에이전트를 재전송시킬 URL을 함께 전달합니다. |
Provider.MatchEndpoint Provider.ValidateClientRedirectUri Provider.ValidateAuthorizeRequest Provider.AuthorizeEndpoint |
| (B) 권한 부여 서버는 (사용자 에이전트를 통해서) 리소스 소유자를 인증하고, 리소스 소유자가 클라이언트의 액세스 요청을 허가하거나 거부했는지 여부를 설정합니다. |
<사용자가 엑세스를 허가한 경우> Provider.MatchEndpoint Provider.ValidateClientRedirectUri Provider.ValidateAuthorizeRequest Provider.AuthorizeEndpoint AuthorizationCodeProvider.CreateAsync |
| (C) 만약 리소스 소유자가 엑세스를 허가했다면, 권한 부여 서버가 기존에 (요청 중 또는 클라이언트 등록 과정에서) 제공된 재전송 URI를 이용해서 사용자 에이전트를 다시 클라이언트로 재전송합니다. | |
| (D) 클라이언트가 이전 단계에서 발급 받은 권한 부여 코드를 이용해서 권한 부여 서버의 토큰 끝점에 엑세스 토큰을 요청합니다. 요청 과정 중, 권한 부여 서버를 통해서 클라이언트가 인증됩니다. 이 때 클라이언트는 권한 부여 코드를 얻기 위해 사용되는 재전송 URI를 검증을 위해 함께 포함시킵니다. |
이미 권한 부여 코드를 허가하기 위한 권한 부여 끝점(OAuthController.Authorize 액션)의 구현을 마쳤기 때문에, 내부적으로 암시적 흐름까지 이미 구현된 셈입니다.
Provider.ValidateClientRedirectUri 메서드는 암시적 허가 흐름에서 엑세스 토큰을 악의적인 클라이언트에게 전송하는 상황(중간자 공격, Man-in-the-middle attack)을 피하기 위해서 클라이언트 ID와 해당 클라이언트 ID에 대한 재전송 URL의 유효성을 검사하기 위한 용도로 사용됩니다.
리소스 소유자 비밀번호 자격 증명 허가
계속해서 이번에는 IETF의 OAuth 2 Resource Owner Password Credentials Grant 절을 검토해보겠습니다.
그림 5에서 볼 수 있는 리소스 소유자 비밀번호 자격 증명 허가(Resource Owner Password Credentials Grant)의 흐름은 OWIN OAuth 미들웨어의 흐름과 다음과 같이 매핑됩니다.
| Resource Owner Password Credentials Grant 절에서 설명하고 있는 흐름의 단계 | 다운로드 받은 예제 코드에서 해당 단계를 수행하는 부분들 |
|---|---|
| (A) 리소스 소유자가 사용자 이름 및 비밀번호와 함께 클라이언트를 제공합니다. | |
| (B) 클라이언트가 리소스 소유자로부터 받은 자격 증명을 포함하여 권한 부여 서버의 토큰 끝점에 엑세스 토큰을 요청합니다. 요청 과정 중, 권한 부여 서버를 통해서 클라이언트가 인증됩니다. |
Provider.MatchEndpoint Provider.ValidateClientAuthentication Provider.ValidateTokenRequest Provider.GrantResourceOwnerCredentials Provider.TokenEndpoint AccessToken Provider.CreateAsync RefreshTokenProvider.CreateAsync |
| (C) 권한 부여 서버가 클라이언트를 인증하고 리소스 소유자가 제출한 자격 증명의 유효성을 검사합니다. 만약 자격 증명이 유효하다면 엑세스 토큰을 발급합니다. |
다음은 Provider.GrantResourceOwnerCredentials의 간단한 구현 예제입니다:
private Task GrantResourceOwnerCredentials(OAuthGrantResourceOwnerCredentialsContext context)
{
    var identity = new ClaimsIdentity(
        new GenericIdentity(context.UserName, OAuthDefaults.AuthenticationType),
        context.Scope.Select(x => new Claim("urn:oauth:scope", x))
    );

    context.Validated(identity);

    return Task.FromResult(0);
}
클라이언트 자격 증명 허가
이번에는 IETF의 OAuth 2 Client Credentials Grant 절을 살펴보겠습니다.
그림 6에서 볼 수 있는 클라이언트 자격 증명 허가(Client Credentials Grant)의 흐름은 OWIN OAuth 미들웨어의 흐름과 다음과 같이 매핑됩니다.
| Client Credentials Grant 절에서 설명하고 있는 흐름의 단계 | 다운로드 받은 예제 코드에서 해당 단계를 수행하는 부분들 |
|---|---|
| (A) 클라이언트가 권한 부여 서버를 통해서 인증을 받고 토큰 끝점에 엑세스 토큰을 요청합니다. |
Provider.MatchEndpoint Provider.ValidateClientAuthentication Provider.ValidateTokenRequest Provider.GrantClientCredentials Provider.TokenEndpoint AccessTokenProvider.CreateAsync RefreshTokenProvider.CreateAsync |
| (B) 권한 부여 서버는 클라이언트를 인증하고, 유효한 경우 엑세스 토큰을 발급합니다. |
다음은 Provider.GrantClientCredentials의 간단한 구현 예제입니다:
private Task GrantClientCredetails(OAuthGrantClientCredentialsContext context)
{
    var identity = new ClaimsIdentity(
        new GenericIdentity(context.ClientId, OAuthDefaults.AuthenticationType),
        context.Scope.Select(x => new Claim("urn:oauth:scope", x))
    );

    context.Validated(identity);

    return Task.FromResult(0);
}
리프레시 토큰
이번에는 IETF의 OAuth 2 Refresh Token 절을 살펴보겠습니다.
그림 2에서 볼 수 있는 리프레시 토큰(Refresh Token)의 흐름은 OWIN OAuth 미들웨어의 흐름과 다음과 같이 매핑됩니다.
| Refresh Token 절에서 설명하고 있는 흐름의 단계 | 다운로드 받은 예제 코드에서 해당 단계를 수행하는 부분들 |
|---|---|
| (G) 클라이언트가 권한 부여 서버를 통해서 인증을 받고 리프레시 토큰을 제출함으로써 새로운 엑세스 토큰을 요청합니다. 클라이언트 인증의 자격 요건은 클라이언트의 유형 및 권한 부여 서버의 정책들에 기반합니다. |
Provider.MatchEndpoint Provider.ValidateClientAuthentication RefreshTokenProvider.ReceiveAsync Provider.ValidateTokenRequest Provider.GrantRefreshToken Provider.TokenEndpoint AccessTokenProvider.CreateAsync RefreshTokenProvider.CreateAsync |
| (H) 권한 부여 서버는 클라이언트를 인증하고 리프레시 토큰의 유효성을 검사합니다. 만약 리프레시 토큰이 유효하면 새로운 엑세스 토큰을 (그리고 필요한 경우 새로운 리프레시 토큰을) 발급합니다. |
다음은 Provider.GrantRefreshToken의 간단한 구현 예제입니다:
public void ConfigureAuth(IAppBuilder app)
{
        // ... 설명을 돕기 위해 나머지 코드는 제거했습니다. ...

        // Refresh token provider which creates and receives refresh token.
        RefreshTokenProvider = new AuthenticationTokenProvider
        {
            OnCreate = CreateRefreshToken,
            OnReceive = ReceiveRefreshToken,
        }
    });
}
private void CreateRefreshToken(AuthenticationTokenCreateContext context)
{
    context.SetToken(context.SerializeTicket());
}

private void ReceiveRefreshToken(AuthenticationTokenReceiveContext context)
{
    context.DeserializeTicket(context.Token);
}
엑세스 토큰으로 보호되는 리소스 서버 구현하기
빈 웹 응용 프로그램 프로젝트를 생성하고 다음 패키지들을 설치합니다:
- Microsoft.AspNet.WebApi.Owin
- Microsoft.Owin.Host.SystemWeb
- Microsoft.Owin.Security.OAuth
그리고 OWIN 시작 클래스를 생성한 다음, 인증과 Web API를 구성합니다. AuthorizationServer\ResourceServer\Startup.cs 파일의 다운로드 받은 예제 코드 내용은 다음과 같습니다.
[assembly: OwinStartup(typeof(ResourceServer.Startup))]

namespace ResourceServer
{
    public partial class Startup
    {
        public void Configuration(IAppBuilder app)
        {
            ConfigureAuth(app);
            ConfigureWebApi(app);
        }
    }
}
다운로드 받은 예제 코드 AuthorizationServer\ResourceServer\App_Start\Startup.Auth.cs 파일의 내용은 다음과 같습니다.
using Microsoft.Owin.Cors;
using Microsoft.Owin.Security.OAuth;
using Owin;

namespace ResourceServer
{
    public partial class Startup
    {
        public void ConfigureAuth(IAppBuilder app)
        {
            app.UseCors(CorsOptions.AllowAll);
            app.UseOAuthBearerAuthentication(new OAuthBearerAuthenticationOptions{});
        }
    }
}
다운로드 받은 예제 코드 AuthorizationServer\ResourceServer\App_Start\Startup.WebApi.cs 파일의 내용은 다음과 같습니다.
using Microsoft.Owin.Security.OAuth;
using Owin;
using System.Web.Http;

namespace ResourceServer
{
    public partial class Startup
    {
        public void ConfigureWebApi(IAppBuilder app)
        {
            var config = new HttpConfiguration();

            // Web API configuration and services
            // Configure Web API to use only bearer token authentication.
            config.SuppressDefaultHostAuthentication();
            config.Filters.Add(new HostAuthenticationFilter(OAuthDefaults.AuthenticationType));

            // Web API routes
            config.MapHttpAttributeRoutes();

            config.Routes.MapHttpRoute(
                name: "DefaultApi",
                routeTemplate: "api/{controller}/{id}",
                defaults: new { id = RouteParameter.Optional }
            );
            app.UseWebApi(config);
        }
    }
}
-
UseCors메서드를 호출해서 모든 도메인에 대한 CORS(Cross-Origin Resource Sharing)를 허용합니다. -
UseOAuthBearerAuthentication메서드를 호출해서 요청의 권한 부여 헤더에 포함된 전달자 토큰(Bearer Token)을 수신하고 그 유효성을 검사하는 OAuth 전달자 토큰 인증 미들웨어를 활성화시킵니다. -
Config.SuppressDefaultHostAuthenticaiton메서드는 응용 프로그램의 기본 호스트 인증 주체를 비활성화시킵니다. 따라서 이 메서드를 호출하고 난 뒤에는 모든 요청들이 익명으로 처리됩니다. -
HostAuthenticationFilter를 설정하면 지정한 인증 형식을 이용한 인증이 가능해집니다. 가령 이번 예제의 경우, 전달자 인증 형식이 바로 그 형식입니다.
인증된 가상의 신원을 나타내기 위해서, 현재 사용자의 클레임(Claims)을 출력하는 ApiController를 생성합니다.
namespace ResourceServer.Controllers
{
    [Authorize]
    public class MeController : ApiController
    {
        // GET api/<controller>
        public IEnumerable<object> Get()
        {
            var identity = User.Identity as ClaimsIdentity;
            return identity.Claims.Select(c => new
            {
                Type = c.Type,
                Value = c.Value
            });
        }
    }
}
만약 권한 부여 서버와 리소스 서버가 동일한 컴퓨터에 위치해 있지 않다면, OAuth 미들웨어가 각각 서로 다른 머신 키를 사용해서 전달자 엑세스 토큰을 암호화하고 복호화하게 됩니다.
두 프로젝트 간에 동일한 개인 키를 공유하기 위해서, 두 프로젝트의 web.config 파일에 동일한 machinekey 설정을 추가합니다.
<configuration>
  <appSettings>
    <!-- 설명을 돕기 위해 나머지 키들은 제거했습니다. -->
  </appSettings>
  <system.web>
    <compilation debug="true" targetFramework="4.5" />
    <httpRuntime targetFramework="4.5" />
    <machineKey decryptionKey="Enter decryption Key here"
                validation="SHA1"
                validationKey="Enter validation Key here" />
  </system.web>
  <runtime>
    <!-- 설명을 돕기 위해 나머지 키들은 제거했습니다. -->
  </runtime>
</configuration>
OAuth 2.0 클라이언트 구현하기
본 자습서에서는 클라이언트 코드를 간단하게 구현하기 위해서 DotNetOpenAuth.OAuth2.Client NuGet 패키지를 이용하겠습니다.
권한 부여 코드 허가 클라이언트
이 클라이언트는 MVC 응용 프로그램으로, 백엔드에서 엑세스 토큰을 얻기 위한 권한 부여 코드 허가 흐름을 시작합니다. 이 클라이언트에는 다음과 같은 단일 페이지만 존재합니다:
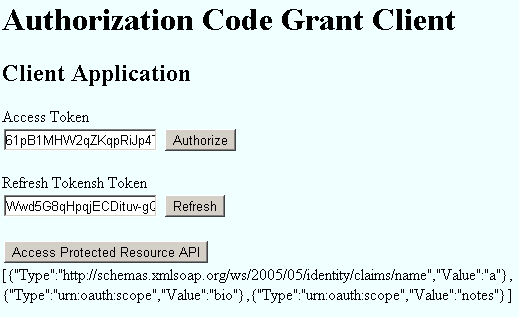
- Authorize 버튼을 누르면 리소스 소유자가 클라이언트의 엑세스를 허가할 수 있도록 브라우저가 권한 부여 서버로 재전송됩니다.
- Refresh 버튼을 누르면 현재의 리프레시 토큰을 사용해서 새로운 엑세스 토큰 및 리프레시 토큰을 받아옵니다.
- Access Protected Resource API 버튼을 누르면 리소스 서버를 호출해서 현재 사용자의 클레임 데이터를 가져오고 이를 페이지에 출력합니다.
다음은 다운로드 받은 이 클라이언트의 HomeController 예제 코드입니다.
using Constants;
using DotNetOpenAuth.OAuth2;
using System;
using System.Net.Http;
using System.Web.Mvc;

namespace AuthorizationCodeGrant.Controllers
{
    public class HomeController : Controller
    {
        private WebServerClient _webServerClient;

        public ActionResult Index()
        {
            ViewBag.AccessToken = Request.Form["AccessToken"] ?? "";
            ViewBag.RefreshToken = Request.Form["RefreshToken"] ?? "";
            ViewBag.Action = "";
            ViewBag.ApiResponse = "";

            InitializeWebServerClient();
            var accessToken = Request.Form["AccessToken"];
            if (string.IsNullOrEmpty(accessToken))
            {
                var authorizationState = _webServerClient.ProcessUserAuthorization(Request);
                if (authorizationState != null)
                {
                    ViewBag.AccessToken = authorizationState.AccessToken;
                    ViewBag.RefreshToken = authorizationState.RefreshToken;
                    ViewBag.Action = Request.Path;
                }
            }

            if (!string.IsNullOrEmpty(Request.Form.Get("submit.Authorize")))
            {
                var userAuthorization = _webServerClient.PrepareRequestUserAuthorization(new[] { "bio", "notes" });
                userAuthorization.Send(HttpContext);
                Response.End();
            }
            else if (!string.IsNullOrEmpty(Request.Form.Get("submit.Refresh")))
            {
                var state = new AuthorizationState
                {
                    AccessToken = Request.Form["AccessToken"],
                    RefreshToken = Request.Form["RefreshToken"]
                };
                if (_webServerClient.RefreshAuthorization(state))
                {
                    ViewBag.AccessToken = state.AccessToken;
                    ViewBag.RefreshToken = state.RefreshToken;
                }
            }
            else if (!string.IsNullOrEmpty(Request.Form.Get("submit.CallApi")))
            {
                var resourceServerUri = new Uri(Paths.ResourceServerBaseAddress);
                var client = new HttpClient(_webServerClient.CreateAuthorizingHandler(accessToken));
                var body = client.GetStringAsync(new Uri(resourceServerUri, Paths.MePath)).Result;
                ViewBag.ApiResponse = body;
            }

            return View();
         }

         private void InitializeWebServerClient()
         {
             var authorizationServerUri = new Uri(Paths.AuthorizationServerBaseAddress);
             var authorizationServer = new AuthorizationServerDescription
             {
                 AuthorizationEndpoint = new Uri(authorizationServerUri, Paths.AuthorizePath),
                 TokenEndpoint = new Uri(authorizationServerUri, Paths.TokenPath)
             };
             _webServerClient = new WebServerClient(authorizationServer, Clients.Client1.Id, Clients.Client1.Secret);
         }
    }
}
기본적으로 DotNetOpenAuth 패키지는 SSL을 필수로 요구합니다.
그러나 본문의 예제에서는 HTTP를 사용하고 있기 때문에, 구성 파일에 다음과 같은 설정을 추가해줘야 합니다:
<configuration>
  <!-- 설명을 돕기 위해 나머지 키들은 제거했습니다. -->

  <dotNetOpenAuth>
    <messaging relaxSslRequirements="true"/>
  </dotNetOpenAuth>
</configuration>
암시적 허가 클라이언트
이 클라이언트는 다음과 같은 용도로 JavaScript를 사용합니다:
- 새로운 창을 열고 권한 부여 서버의 권한 부여 끝점으로 재전송합니다.
- 다시 재전송 되고 나면, URL 조각으로부터 엑세스 토큰을 가져옵니다.
다음 그림은 이 처리과정을 보여주고 있습니다:
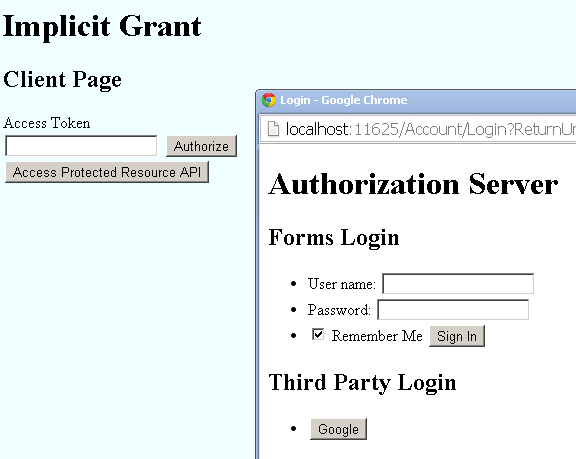
이 클라이언트는 두 개의 페이지, 즉 홈 페이지와 콜백 페이지를 갖고 있습니다.
다음은 Index.cshtml 파일에 구현되어 있는 예제 JavaScript 코드입니다:
<script type="text/javascript">
    (function ($) {
        var authorizeUri = '@(Paths.AuthorizationServerBaseAddress + Paths.AuthorizePath)';
        var tokenUri = '@(Paths.AuthorizationServerBaseAddress + Paths.TokenPath)';
        var apiUri = '@(Paths.ResourceServerBaseAddress + Paths.MePath)';
        var returnUri = '@Paths.ImplicitGrantCallBackPath';

        $('#Authorize').click(function () {
            var nonce = 'my-nonce';

            var uri = addQueryString(authorizeUri, {
                'client_id': '7890ab',
                'redirect_uri': returnUri,
                'state': nonce,
                'scope': 'bio notes',
                'response_type': 'token',
            });

            window.oauth = {};
            window.oauth.signin = function (data) {
                if (data.state !== nonce) {
                    return;
                }
                $('#AccessToken').val(data.access_token);
            }

            window.open(uri, 'Authorize', 'width=640,height=480');
        });

        $('#CallApi').click(function () {
            $.ajax(apiUri, {
                beforeSend: function (xhr) {
                    xhr.setRequestHeader('Authorization', 'Bearer ' + $('#AccessToken').val());
                },
                dataType: 'text',
                cache: false,
                success: function (data) {
                    console.log(data);
                    $('#output').text(data);
                }
            });
        });

        function addQueryString(uri, parameters) {
            var delimiter = (uri.indexOf('?') == -1) ? '?' : '&';
            for (var parameterName in parameters) {
                var parameterValue = parameters[parameterName];
                uri += delimiter + encodeURIComponent(parameterName) + '=' + encodeURIComponent(parameterValue);
                delimiter = '&';
            }
            return uri;
        }
    })(jQuery);
</script>
그리고 다음은 SignIn.cshtml 파일에 구현되어 있는 콜백 처리 코드입니다:
<script type="text/javascript">
    (function ($) {
        function getFragment() {
            if (window.location.hash.indexOf("#") === 0) {
                return parseQueryString(window.location.hash.substr(1));
            } else {
                return {};
            }
        }

        function parseQueryString(queryString) {
            var data = {},
                pairs, pair, separatorIndex, escapedKey, escapedValue, key, value;

            if (queryString === null) {
                return data;
            }

            pairs = queryString.split("&");

            for (var i = 0; i < pairs.length; i++) {
                pair = pairs[i];
                separatorIndex = pair.indexOf("=");

                if (separatorIndex === -1) {
                    escapedKey = pair;
                    escapedValue = null;
                } else {
                    escapedKey = pair.substr(0, separatorIndex);
                    escapedValue = pair.substr(separatorIndex + 1);
                }

                key = decodeURIComponent(escapedKey);
                value = decodeURIComponent(escapedValue);
                data[key] = value;
            }

            return data;
        }

        var fragments = getFragment();
        if (window.opener && window.opener.oauth && window.opener.oauth.signin) {
            window.opener.oauth.signin(fragments);
        }
        window.close();
    })(jQuery);
</script>
리소스 소유자 비밀번호 자격 증명 허가 클라이언트
이 클라이언트는 콘솔 응용 프로그램을 이용해서 구현되었습니다. 다음은 그 코드입니다:
class Program
{
    private static WebServerClient _webServerClient;
    private static string _accessToken;

    static void Main(string[] args)
    {
        InitializeWebServerClient();

        Console.WriteLine("Requesting Token...");
        RequestToken();

        Console.WriteLine("Access Token: {0}", _accessToken);

        Console.WriteLine("Access Protected Resource");
        AccessProtectedResource();
    }

    private static void InitializeWebServerClient()
    {
        var authorizationServerUri = new Uri(Paths.AuthorizationServerBaseAddress);
        var authorizationServer = new AuthorizationServerDescription
        {
            AuthorizationEndpoint = new Uri(authorizationServerUri, Paths.AuthorizePath),
            TokenEndpoint = new Uri(authorizationServerUri, Paths.TokenPath)
        };
        _webServerClient = new WebServerClient(authorizationServer, Clients.Client1.Id, Clients.Client1.Secret);
    }

    private static void RequestToken()
    {
        var state = _webServerClient.GetClientAccessToken(new[] { "bio", "notes" });
        _accessToken = state.AccessToken;
    }

    private static void AccessProtectedResource()
    {
        var resourceServerUri = new Uri(Paths.ResourceServerBaseAddress);
        var client = new HttpClient(_webServerClient.CreateAuthorizingHandler(_accessToken));
        var body = client.GetStringAsync(new Uri(resourceServerUri, Paths.MePath)).Result;
        Console.WriteLine(body);
    }
}
클라이언트 자격 증명 허가 클라이언트
이 클라이언트는 리소스 소유자 비밀번호 자격 증명 허가 클라이언트와 비슷한 콘솔 응용 프로그램으로, 다음은 그 코드입니다:
class Program
{
    private static WebServerClient _webServerClient;
    private static string _accessToken;

    static void Main(string[] args)
    {
        InitializeWebServerClient();

        Console.WriteLine("Requesting Token...");
        RequestToken();

        Console.WriteLine("Access Token: {0}", _accessToken);

        Console.WriteLine("Access Protected Resource");
        AccessProtectedResource();
    }

    private static void InitializeWebServerClient()
    {
        var authorizationServerUri = new Uri(Paths.AuthorizationServerBaseAddress);
        var authorizationServer = new AuthorizationServerDescription
        {
            AuthorizationEndpoint = new Uri(authorizationServerUri, Paths.AuthorizePath),
            TokenEndpoint = new Uri(authorizationServerUri, Paths.TokenPath)
        };
        _webServerClient = new WebServerClient(authorizationServer, Clients.Client1.Id, Clients.Client1.Secret);
    }

    private static void RequestToken()
    {
        var state = _webServerClient.ExchangeUserCredentialForToken("test", "test", new[] { "bio", "notes" });
        _accessToken = state.AccessToken;
    }

    private static void AccessProtectedResource()
    {
        var resourceServerUri = new Uri(Paths.ResourceServerBaseAddress);
        var client = new HttpClient(_webServerClient.CreateAuthorizingHandler(_accessToken));
        var body = client.GetStringAsync(new Uri(resourceServerUri, Paths.MePath)).Result;
        Console.WriteLine(body);
    }
}
이 기사는 2014년 3월 20일에 최초 작성되었습니다.
- Katana 프로젝트 2015-07-13 08:00
- OWIN 및 Katana 시작하기 2015-07-20 08:00
- OWIN 시작 클래스 감지방식 2015-07-27 08:00
- Katana에서 Windows 인증 사용하기 2015-08-03 08:00
- IIS 통합 파이프라인과 OWIN 미들웨어 2015-08-10 08:00
- Azure 작업자 역할에 OWIN 호스트하기 2015-08-17 08:00
- OWIN OAuth 2.0 권한 부여 서버 2015-09-07 08:00


