
 sign in
 join
join
인증: ASP.NET Core Identity 살펴보기
- 본 번역문서의 원문은 Introduction to Identity docs.microsoft.com 입니다.
- 본 번역문서는 ASP.NET Core 보안(인증) : Identity 살펴보기 www.taeyo.net 에서도 함께 제공됩니다.
ASP.NET Core Identity는 응용 프로그램에 로그인 기능을 추가할 수 있게 해주는 멤버십 시스템입니다. 사용자는 계정을 생성한 다음 사용자 이름과 비밀번호를 사용해서 로그인하거나, Facebook, Google, Microsoft Account, Twitter 같은 외부 로그인 공급자를 사용할 수 있습니다.
일반적으로 ASP.NET Core Identity는 SQL Server 데이터베이스를 사용해서 사용자 이름과 비밀번호 그리고 프로필 정보를 저장하도록 구성됩니다. 그러나 Azure Table Storage 같은 다른 자체적인 영구적 저장소에 데이터를 저장할 수도 있습니다.
Identity 개요
본 자습서에서는 ASP.NET Core Identity를 이용해서 사용자를 등록하고, 로그인하고, 로그아웃 하는 기능을 구현하는 방법을 살펴봅니다. 전 과정을 단계에 맞춰 따라해보거나 특정 단계의 세부 정보만 읽어봐도 무방합니다. ASP.NET Core Identity를 이용해서 응용 프로그램을 생성하는 보다 상세한 방법은 본문의 마지막 절인 후속 과정 절을 참고하시기 바랍니다.
-
Visual Studio에서 개별 사용자 계정(Individual User Accounts) 옵션으로 새로운 ASP.NET Core 웹 응용 프로그램 생성하기
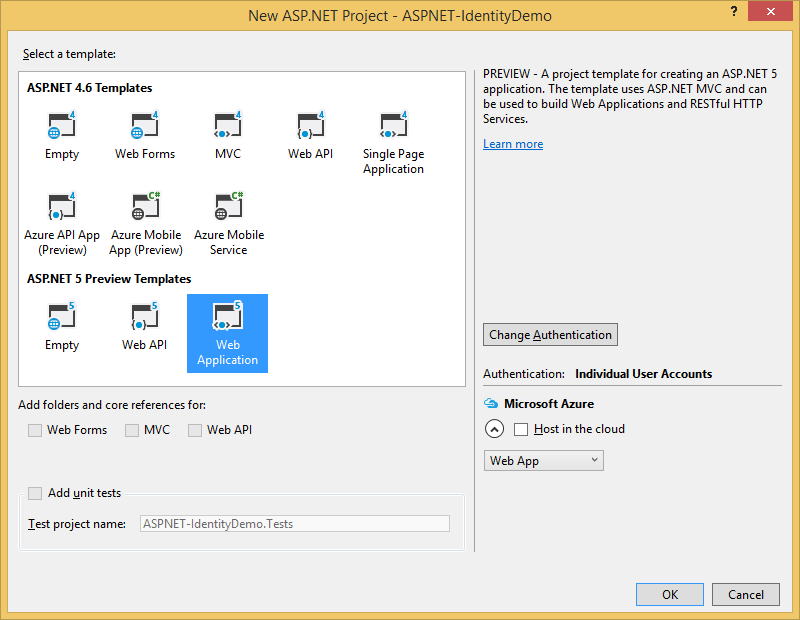
먼저 Visual Studio를 실행하고 파일(File) -> 새로 만들기(New) -> 프로젝트(Project)를 차례대로 선택합니다. 그런 다음, 새 프로젝트(New Project) 대화 상자가 나타나면 ASP.NET Core Web Application (.NET Core)를 선택합니다. 계속해서 ASP.NET Core Templates에서 웹 응용 프로그램(Web Application)을 선택한 다음, 인증 방법을 개별 사용자 계정(Individual User Accounts)으로 변경하고 프로젝트 생성을 완료합니다.
역주
2017년 01월 현재, 가장 최신 버전인 Visual Studio 2015 Update 3의 대화 상자 모습은 아래 그림과 다소 차이가 납니다. 본문에서는 최신 버전을 기준으로 번역을 진행합니다.
이렇게 만들어진 프로젝트에는
Microsoft.AspNetCore.Identity.EntityFrameworkCore패키지가 자동으로 포함되는데, 이 패키지는 Entity Framework Core를 이용해서 신원(Identity) 데이터와 스키마를 SQL Server 서버에 저장하는 패키지입니다.노트
Visual Studio에서 도구(Tools) -> NuGet 패키지 관리자(NuGet Package Manager) -> 솔루션용 NuGet 패키지 관리(Manage NuGet Packages for Solution)를 선택하면 솔루션에 설치된 NuGet 패키지들의 자세한 정보를 확인할 수 있습니다. 또는 프로젝트의 project.json 파일에 정의되어 있는 dependencies 섹션에서도 설치된 패키지들의 목록을 확인할 수 있습니다.
Identity 서비스는
Startup클래스의ConfigureServices메서드에서 응용 프로그램에 추가됩니다:역주
가장 최신 버전인 Visual Studio 2015 Update 3에서 생성되는 템플릿 코드는 원문의 코드와 일부 차이가 존재합니다. 본 번역문에서는 최신 버전을 기준으로 예제 코드에 첨삭을 가하도록 하겠습니다.
// This method gets called by the runtime. Use this method to add services to the container.
public void ConfigureServices(IServiceCollection services)
{
    // Add framework services.
    services.AddDbContext(options =>
        options.UseSqlServer(Configuration.GetConnectionString("DefaultConnection")));

    services.AddIdentity<ApplicationUser, IdentityRole>()
        .AddEntityFrameworkStores<ApplicationDbContext>()
        .AddDefaultTokenProviders();

    services.AddMvc();

    // Add application services.
    services.AddTransient<IEmailSender, AuthMessageSender>();
    services.AddTransient<ISmsSender, AuthMessageSender>();
이 과정을 거치고 나면 의존성 주입을 통해서 응용 프로그램 내에서 이 서비스를 사용할 수 있습니다.
마지막으로
Startup클래스의Configure메서드에서UseIdentity메서드를 호출하면 응용 프로그램에서 Identity가 활성화됩니다. 다음에 추가된 코드는 요청 파이프라인에 쿠키 기반 인증을 추가합니다.// Configure Identity services.Configure<IdentityOptions>(options => { // Password settings options.Password.RequireDigit = true; options.Password.RequiredLength = 8; options.Password.RequireNonAlphanumeric = false; options.Password.RequireUppercase = true; options.Password.RequireLowercase = false; // Lockout settings options.Lockout.DefaultLockoutTimeSpan = TimeSpan.FromMinutes(30); options.Lockout.MaxFailedAccessAttempts = 10; // Cookie settings options.Cookies.ApplicationCookie.ExpireTimeSpan = TimeSpan.FromDays(150); options.Cookies.ApplicationCookie.LoginPath = "/Account/LogIn"; options.Cookies.ApplicationCookie.LogoutPath = "/Account/LogOff"; // User settings options.User.RequireUniqueEmail = true; }); } // This method gets called by the runtime. Use this method to configure the HTTP request pipeline. public void Configure(IApplicationBuilder app, IHostingEnvironment env, ILoggerFactory loggerFactory) { loggerFactory.AddConsole(Configuration.GetSection("Logging")); loggerFactory.AddDebug(); if (env.IsDevelopment()) { app.UseDeveloperExceptionPage(); app.UseDatabaseErrorPage(); app.UseBrowserLink(); } else { app.UseExceptionHandler("/Home/Error")); } app.UseStaticFiles(); app.UseIdentity();ASP.NET Core 응용 프로그램의 구동 절차에 대한 보다 자세한 정보는 응용 프로그램 Startup 클래스 문서를 참고하시기 바랍니다.
-
사용자 생성하기
Visual Studio에서 응용 프로그램을 실행한 다음 (디버그(Debug) -> 디버깅 시작(Start Debugging)), 브라우저에서 Register 링크를 클릭해서 사용자 생성 페이지로 이동합니다. 다음 그림은 사용자 이름과 비밀번호를 입력받는 Register 페이지를 보여줍니다.

사용자가 각 항목들을 입력하고 Register 링크를 클릭하면,
Account컨트롤러에UserManager서비스와SignInManager서비스가 주입됩니다:public class AccountController : Controller { private readonly UserManager<ApplicationUser> _userManager; private readonly SignInManager<ApplicationUser> _signInManager; private readonly IEmailSender _emailSender; private readonly ISmsSender _smsSender; private static bool _databaseChecked; private readonly ILogger _logger; public AccountController( UserManager<ApplicationUser> userManager, SignInManager<ApplicationUser> signInManager, IEmailSender emailSender, ISmsSender smsSender, ILoggerFactory loggerFactory) { _userManager = userManager; _signInManager = signInManager; _emailSender = emailSender; _smsSender = smsSender; _logger = loggerFactory.CreateLogger<AccountController>(); } // // GET: /Account/Login그리고 다음과 같이 Register 액션에서
UserManager개체의CreateAsync메서드가 호출되어 사용자가 생성됩니다:[HttpPost] [AllowAnonymous] [ValidateAntiForgeryToken] public async Task<IActionResult> Register(RegisterViewModel model) { if (ModelState.IsValid) { var user = new ApplicationUser { UserName = model.Email, Email = model.Email }; var result = await _userManager.CreateAsync(user, model.Password); if (result.Succeeded) { // For more information on how to enable account confirmation and password reset please visit http://go.microsoft.com/fwlink/?LinkID=532713 // Send an email with this link //var code = await _userManager.GenerateEmailConfirmationTokenAsync(user); //var callbackUrl = Url.Action("ConfirmEmail", "Account", new { userId = user.Id, code = code }, protocol: HttpContext.Request.Scheme); //await _emailSender.SendEmailAsync(model.Email, "Confirm your account", // "Please confirm your account by clicking this link: <a href=\"" + callbackUrl + "\">link</a>"); await _signInManager.SignInAsync(user, isPersistent: false); _logger.LogInformation(3, "User created a new account with password."); return RedirectToAction(nameof(HomeController.Index), "Home"); } AddErrors(result); } // If we got this far, something failed, redisplay form return View(model); }역주
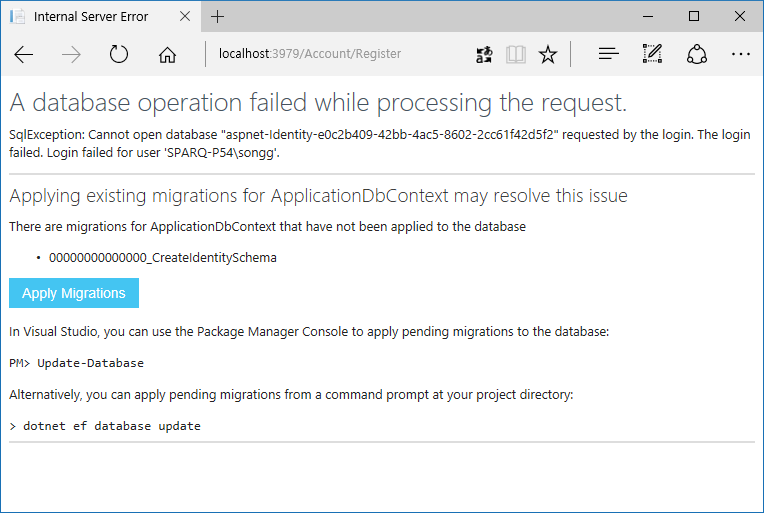
만약 이 단계에서 다음과 같은 오류가 발생한다면 Apply Migrations 버튼을 누르고 다시 시도하면 됩니다.
-
로그인하기
사용자가 성공적으로 생성되고 나면
Register액션 코드의 일부인SignInAsync메서드 호출에 의해서 사용자가 로그인됩니다. 이 로그인 과정 중,SignInAsync메서드는 사용자의 클레임을 담고 있는 쿠키를 저장합니다.[HttpPost] [AllowAnonymous] [ValidateAntiForgeryToken] public async Task<IActionResult> Register(RegisterViewModel model) { if (ModelState.IsValid) { var user = new ApplicationUser { UserName = model.Email, Email = model.Email }; var result = await _userManager.CreateAsync(user, model.Password); if (result.Succeeded) { // For more information on how to enable account confirmation and password reset please visit http://go.microsoft.com/fwlink/?LinkID=532713 // Send an email with this link //var code = await _userManager.GenerateEmailConfirmationTokenAsync(user); //var callbackUrl = Url.Action("ConfirmEmail", "Account", new { userId = user.Id, code = code }, protocol: HttpContext.Request.Scheme); //await _emailSender.SendEmailAsync(model.Email, "Confirm your account", // "Please confirm your account by clicking this link: <a href=\"" + callbackUrl + "\">link</a>"); await _signInManager.SignInAsync(user, isPersistent: false); _logger.LogInformation(3, "User created a new account with password."); return RedirectToAction(nameof(HomeController.Index), "Home"); } AddErrors(result); } // If we got this far, something failed, redisplay form return View(model); }이
SignInAsync메서드는SignInManager클래스에서 제공되는 메서드입니다.필요한 경우, 컨트롤러 액션 내에서 로그인한 사용자의 신원 세부 정보에 접근할 수도 있습니다. 예를 들어서,
HomeController.Index액션 메서드에 중단점을 설정하고User.claims속성을 살펴보면 그 세부 정보를 확인할 수 있습니다. 이렇게 사용자가 로그인을 하고 나면 적절한 권한을 부여할 수 있는데, 권한부여에 대한 보다 자세한 정보는 권한부여 문서들을 참고하시기 바랍니다.등록된 사용자는 Log in 링크를 클릭해서 웹 응용 프로그램에 로그인 할 수도 있습니다. 등록된 사용자가 로그인을 시도하면
AccountController의Login액션이 호출됩니다. 그러면Login액션은PasswordSignInAsync메서드를 이용해서 사용자를 로그인시킵니다.[HttpPost] [AllowAnonymous] [ValidateAntiForgeryToken] public async Task<IActionResult> Login(LoginViewModel model, string returnUrl = null) { ViewData["ReturnUrl"] = returnUrl; if (ModelState.IsValid) { // This doesn't count login failures towards account lockout // To enable password failures to trigger account lockout, set lockoutOnFailure: true var result = await _signInManager.PasswordSignInAsync(model.Email, model.Password, model.RememberMe, lockoutOnFailure: false); if (result.Succeeded) { _logger.LogInformation(1, "User logged in."); return RedirectToLocal(returnUrl); } if (result.RequiresTwoFactor) { return RedirectToAction(nameof(SendCode), new { ReturnUrl = returnUrl, RememberMe = model.RememberMe }); } if (result.IsLockedOut) { _logger.LogWarning(2, "User account locked out."); return View("Lockout"); } else { ModelState.AddModelError(string.Empty, "Invalid login attempt."); return View(model); } } // If we got this far, something failed, redisplay form return View(model); } -
로그오프하기
Log off 링크를 클릭하면
Account컨트롤러의LogOff액션이 호출됩니다.[HttpPost] [ValidateAntiForgeryToken] public async Task<IActionResult> LogOff() { await _signInManager.SignOutAsync(); _logger.LogInformation(4, "User logged out."); return RedirectToAction(nameof(HomeController.Index), "Home"); }위의 코드를 살펴보면
SignInManager.SignOutAsync메서드가 호출되는 것을 알 수 있습니다. 이SignOutAsync메서드는 쿠키에 저장된 사용자의 클레임을 제거합니다. -
구성
Identity는 응용 프로그램의 구동 클래스에서 재지정 할 수 있는 몇 가지 기본적인 동작을 갖고 있습니다.
// Configure Identity
services.Configure<IdentityOptions>(options =>
{
    // Password settings
    options.Password.RequireDigit = true;
    options.Password.RequiredLength = 8;
    options.Password.RequireNonAlphanumeric = false;
    options.Password.RequireUppercase = true;
    options.Password.RequireLowercase = false;

    // Lockout settings
    options.Lockout.DefaultLockoutTimeSpan = TimeSpan.FromMinutes(30);
    options.Lockout.MaxFailedAccessAttempts = 10;

    // Cookie settings
    options.Cookies.ApplicationCookie.ExpireTimeSpan = TimeSpan.FromDays(150);
    options.Cookies.ApplicationCookie.LoginPath = "/Account/LogIn";
    options.Cookies.ApplicationCookie.LogoutPath = "/Account/LogOff";

    // User settings
    options.User.RequireUniqueEmail = true;
});
보다 자세한 Identity 구성 방법은 Configure Identity 문서를 참고하시기 바랍니다.
기본 키의 데이터 형식도 구성 가능합니다. Configure Identity primary keys data type 문서를 참고하시기 바랍니다.
-
데이터베이스 살펴보기
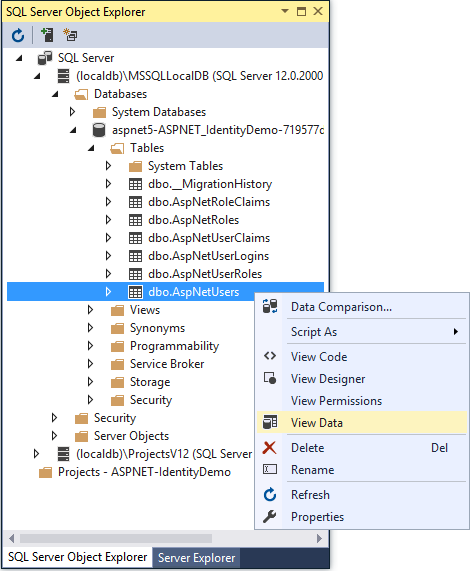
응용 프로그램을 중지한 다음, Visual Studio에서 보기(View) -> SQL Server 개체 탐색기(SQL Server Object Explorer)를 선택해서 사용자 데이터베이스를 살펴봅니다. SQL Server 개체 탐색기(SQL Server Object Explorer)에서 다음을 차례대로 확장합니다:
-
(localdb)MSSQLLocalDB
-
데이터베이스(Databases)
-
aspnet5-<the name of your application>
-
테이블(Tables)
그리고 dbo.AspNetUsers 테이블을 마우스 오른쪽 버튼으로 클릭한 다음, 데이터 보기(View Data)를 선택해서 생성한 사용자의 세부 정보를 확인합니다.
-
Identity 구성 요소
Identity 시스템의 가장 핵심적인 참조 어셈블리는 Microsoft.AspNetCore.Identity입니다.
이 패키지에는 ASP.NET Core Identity를 위한 주요 인터페이스 모음이 포함되어 있습니다.
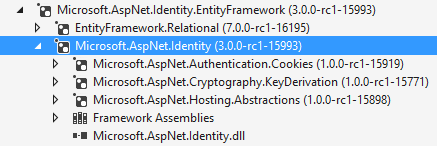
ASP.NET Core 응용 프로그램에서 Identity 시스템을 사용하려면 다음과 같은 의존성들이 필요합니다:
-
EntityFramework.SqlServer- Entity Framework는 관계형 데이터베이스에 대한 Microsoft의 권장 데이터 접근 기술입니다. -
Microsoft.AspNetCore.Authentication.Cookies- 응용 프로그램에서 ASP.NET의 폼 인증과 비슷한 쿠키 기반 인증을 사용할 수 있게 해주는 미들웨어입니다. -
Microsoft.AspNetCore.Cryptography.KeyDerivation- 키 파생을 위한 유틸리티입니다. -
Microsoft.AspNetCore.Hosting.Abstractions- 호스팅 추상화입니다.
ASP.NET Identity로 마이그레이션하기
기존 Identity 저장소를 마이그레이션하는 방법에 대한 위한 추가적인 정보와 지침은 Migrating Authentication and Identity 문서를 참고하시기 바랍니다.
후속 과정
- 권한부여: 개요 2017-01-14 08:00
- 권한부여: 간단한 권한부여 2017-01-14 11:00
- 권한부여: 역할 기반 권한부여 2017-01-14 14:00
- 권한부여: 클레임 기반 권한부여 2017-01-15 08:00
- 권한부여: 사용자 지정 정책 기반 권한부여 2017-01-15 11:00
- 권한부여: 요구사항 처리기와 의존성 주입 2017-01-15 14:00
- 권한부여: 리소스 기반 권한부여 2017-01-16 08:00
- 권한부여: 뷰 기반 권한부여 2017-01-16 11:00
- 권한부여: 스키마별 신원 제한 2017-01-16 14:00
- 인증: ASP.NET Core Identity 살펴보기 2017-01-30 08:00
- 인증: Facebook, Google 및 기타 외부 공급자를 이용한 인증 활성화시키기 2017-02-13 08:00
- 인증: Facebook 인증 구성하기 2017-02-13 11:00
- 인증: Twitter 인증 구성하기 2017-02-20 08:00
- 인증: Google 인증 구성하기 2017-02-20 11:00
- 인증: Microsoft 계정 인증 구성하기 2017-02-20 14:00
- 인증: 계정 확인 및 비밀번호 복구 2017-03-06 08:00
- 인증: SMS를 이용한 2단계 인증 2017-03-13 08:00
- 인증: ASP.NET Core Identity 없이 Cookie 미들웨어 사용하기 2017-03-20 08:00
- 데이터 보호: 데이터 보호 개요 2017-03-27 08:00
- 데이터 보호: 데이터 보호 API 시작하기 2017-03-29 08:00
- 데이터 보호: 소비자 APIs 개요 2017-03-31 08:00
- 데이터 보호: 용도 문자열 2017-04-03 08:00
- 데이터 보호: ASP.NET Core의 용도 계층 구조 및 다중-테넌트(Multi-Tenancy) 2017-04-05 08:00
- 데이터 보호: 비밀번호 해싱 2017-04-07 08:00
- 데이터 보호: 보호된 페이로드의 수명 제한하기 2017-04-10 08:00
- 테이터 보호: 키가 취소된 페이로드의 보호 해제하기 2017-04-12 08:00
- 데이터 보호: 데이터 보호 구성하기 2017-04-14 08:00
- 데이터 보호: 키 관리 및 수명 기본 설정 2017-04-17 08:00
- 데이터 보호: 머신 수준 정책 2017-04-19 08:00
- 데이터 보호: 비-DI 인식 시나리오 2017-04-21 08:00
- 호환성: 응용 프로그램 간 인증 쿠키 공유하기 2017-05-12 08:00
- 호환성: ASP.NET의 <machineKey> 요소 대체하기 2017-05-16 08:00
- 교차 원본 요청 활성화시키기 (CORS) 2017-05-17 08:00
- ASP.NET Core 응용 프로그램에 SSL 적용하기 2017-05-18 08:00
- 개발 중 민감한 응용 프로그램 정보 안전하게 저장하기 2017-05-19 08:00


