
 sign in
 join
join
Emotion API C# 퀵 스타트
- 본 번역문서의 원문은 Emotion API C# Quick Start docs.microsoft.com 입니다.
- 본 번역문서는 AI : Face API C# 퀵 스타트 www.taeyo.net 에서도 함께 제공됩니다.
중요
기존의 Video API 미리보기는 2017년 10월 30일에 만료되었습니다. 새로운 Video Indexer API 미리보기를 이용해서 동영상에서 손쉽게 의미 있는 정보를 얻고, 말/음성, 얼굴, 인물 및 감정을 감지하여 검색 결과 같은 콘텐츠 탐색 경험을 향상시켜 보십시오. 보다 자세한 정보는 Video Indexer (미리보기)를 참고하시기 바랍니다.
본문에서는 C#과 Emotion API의 Recognize 메서드를 사용해서 Emotion API 미리보기를 신속하게 시작할 수 있는 유용한 정보와 예제 코드를 제공합니다. 이를 통해서 이미지에 포함된 한 명 이상의 사람들이 표현하는 감정을 인식할 수 있습니다.
요구 사항
- Cognitive Services의 Emotion API Windows SDK (역주: 본문에서는 사용하지 않습니다.)
- 무료 구독 키 발급받기: 무료 평가판 서비스 가입
감정 인식 C# 요청 예제
Visual Studio에서 새로운 콘솔 솔루션을 생성하고 Program.cs 파일의 내용을 다음 코드로 대체합니다.
using System;
using System.IO;
using System.Net.Http.Headers;
using System.Net.Http;
using Newtonsoft.Json.Linq;

namespace CSHttpClientSample
{
    static class Program
    {
        static void Main()
        {
            Console.Write("Enter the path to a JPEG image file:");
            string imageFilePath = Console.ReadLine();

            MakeRequest(imageFilePath);

            Console.WriteLine("\n\n\nWait for the result below, then hit ENTER to exit...\n\n\n");
            Console.ReadLine(); // wait for ENTER to exit program
        }

        static byte[] GetImageAsByteArray(string imageFilePath)
        {
            FileStream fileStream = new FileStream(imageFilePath, FileMode.Open, FileAccess.Read);
            BinaryReader binaryReader = new BinaryReader(fileStream);
            return binaryReader.ReadBytes((int)fileStream.Length);
        }

        static async void MakeRequest(string imageFilePath)
        {
            var client = new HttpClient();

            // Request headers - replace this example key with your valid key.
            client.DefaultRequestHeaders.Add("Ocp-Apim-Subscription-Key", "<your-subscription-key>"); //

            // NOTE: You must use the same region in your REST call as you used to obtain your subscription keys.
            //   For example, if you obtained your subscription keys from westcentralus, replace "westus" in the
            //   URI below with "westcentralus".
            string uri = "https://westus.api.cognitive.microsoft.com/emotion/v1.0/recognize?";
            HttpResponseMessage response;
            string responseContent;

            // Request body. Try this sample with a locally stored JPEG image.
            byte[] byteData = GetImageAsByteArray(imageFilePath);

            using (var content = new ByteArrayContent(byteData))
            {
                // This example uses content type "application/octet-stream".
                // The other content types you can use are "application/json" and "multipart/form-data".
                content.Headers.ContentType = new MediaTypeHeaderValue("application/octet-stream");
                response = await client.PostAsync(uri, content);
                responseContent = response.Content.ReadAsStringAsync().Result;
            }

            // A peek at the raw JSON response.
            Console.WriteLine(responseContent);

            // Processing the JSON into manageable objects.
            JToken rootToken = JArray.Parse(responseContent).First;

            // First token is always the faceRectangle identified by the API.
            JToken faceRectangleToken = rootToken.First;

            // Second token is all emotion scores.
            JToken scoresToken = rootToken.Last;

            // Show all face rectangle dimensions
            JEnumerable<JToken> faceRectangleSizeList = faceRectangleToken.First.Children();
            foreach (var size in faceRectangleSizeList) {
                Console.WriteLine(size);
            }

            // Show all scores
            JEnumerable<JToken> scoreList = scoresToken.First.Children();
            foreach (var score in scoreList) {
                Console.WriteLine(score);
            }
        }
    }
}
string uri의 값을 여러분이 구독 키를 발급받은 지역을 사용하도록 변경합니다.
그리고 Ocp-Apim-Subscription-Key 값도 여러분이 발급받은 유효한 구독 키로 대체합니다.
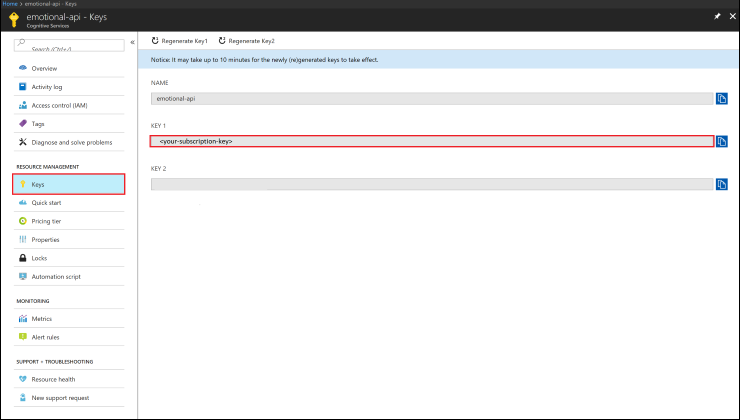
발급받은 구독 키의 값은 Azure 포털에서 확인할 수 있습니다.
Emotion API 리소스의 좌측 탐색 패인에서 Keys 항목을 선택하면 구독 키를 확인할 수 있습니다.
비슷한 방식으로, Overview 항목을 선택하면 나열되는 정보들 중 Endpoint에서 적절한 연결 URI를 확인할 수 있습니다.
API 요청의 응답을 처리하기 위해서는 Newtonsoft.Json 같은 라이브러리를 사용해야 합니다.
그러면 Tokens라는 일련의 관리 가능한 객체로 JSON 문자열을 처리할 수 있습니다.
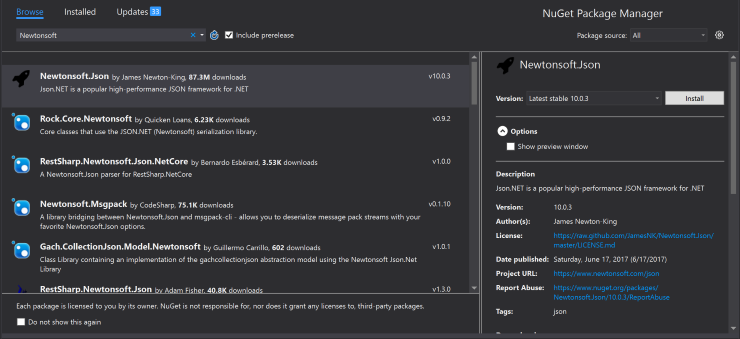
이 라이브러리를 패키지에 추가하려면 솔루션 탐색기에서 마우스 오른쪽 버튼으로 프로젝트를 클릭한 다음, Nuget 패키지 관리(Manage Nuget Packages)를 선택합니다.
그리고 Newtonsoft를 검색합니다.
그러면 첫 번째 검색 결과로 Newtonsoft.Json가 나타날 것입니다.
이 패키지를 선택하고 설치(Install)를 누릅니다.
이제 응용 프로그램에서 이 라이브러리를 참조할 수 있습니다.
감정 인식 결과 응답 살펴보기
호출에 성공하면 얼굴 항목들과 각 항목에 관련된 감정 점수들의 배열이 반환됩니다. 이때 얼굴 사각형 크기의 역순으로 순위가 매겨집니다. 반면 빈 응답은 얼굴이 감지되지 않았음을 의미합니다. 감정 항목은 다음과 같은 필드들을 포함하고 있습니다:
- faceRectangle - 이미지 상의 얼굴 직사각형의 위치.
- scores - 이미지의 각 얼굴들에 대한 감정 점수.
application/json
[
  {
    "faceRectangle": {
      "left": 68,
      "top": 97,
      "width": 64,
      "height": 97
    },
    "scores": {
      "anger": 0.00300731952,
      "contempt": 5.14648448E-08,
      "disgust": 9.180124E-06,
      "fear": 0.0001912825,
      "happiness": 0.9875571,
      "neutral": 0.0009861537,
      "sadness": 1.889955E-05,
      "surprise": 0.008229999
    }
  }
]- Emotion API 2018-01-09 08:00
- Emotion API cURL 퀵 스타트 2018-01-11 08:00
- Emotion API C# 퀵 스타트 2018-01-16 08:00
- Emotion API Android Java 퀵 스타트 2018-01-18 08:00
- Emotion API JavaScript 퀵 스타트 2018-01-23 08:00
- Emotion API C# 자습서 2018-01-25 08:00


