
 sign in
 join
join
Swagger를 이용한 ASP.NET Web API 도움말 페이지 만들기
- 본 번역문서의 원문은 ASP.NET Web API Help Pages using Swagger docs.asp.net 입니다.
- 본 번역문서는 Swagger를 이용한 ASP.NET Web API 도움말 페이지 만들기 www.taeyo.net 에서도 함께 제공됩니다.
특정 API를 활용해서 응용 프로그램을 구현할 때, 개발자에게는 API가 제공해주는 다양한 메서드들을 이해하는 일이 또 다른 부담이 될 수도 있습니다.
몇 가지 NuGet 패키지를 추가하고 Startup.cs 파일을 조금만 변경하면, .NET Core 용으로 구현된 Swashbuckle로 생성한 Swagger 문서를 이용해서 훌륭한 문서와 도움말 페이지를 Web API의 일부로 간단하게 생성할 수 있습니다.
- Swashbuckle은 ASP.NET Core MVC에 내장된, Web APIs에 대한 Swagger 문서를 생성해주는 오픈 소스 프로젝트입니다.
- Swagger는 대화형 문서와 클라이언트 SDK의 생성 및 검색 기능을 지원해주는 RESTful API의 머신 가독형 표현입니다.
본 자습서는 ASP.NET Core MVC와 Visual Studio를 이용한 첫 번째 Web API 구현 자습서의 예제를 기반으로 진행됩니다. 직접 본문의 과정들을 따라해보고 싶다면 GitHub에서 예제를 다운로드 받으시기 바랍니다.
목차:
시작하기
Swashbuckle는 다음과 같은 두 가지 핵심 구성 요소로 이루어져 있습니다.
- Swashbuckle.SwaggerGen : 개체, 메서드, 반환 형식 등을 기술하는 JSON Swagger 문서를 생성하는 기능을 제공합니다.
- Swashbuckle.SwaggerUI : Swagger UI 도구의 ASP.NET Core 내장 버전으로, 위의 문서를 이용해서 Web API의 기능에 대한 풍부한 사용자 지정 경험을 지원되는 설명 기능을 제공해주며, 공개 메서드들에 대한 내장된 테스트 도구 기능도 포함하고 있습니다.
NuGet 패키지
다음 중 한 가지 방법을 이용해서 Swashbuckle을 추가할 수 있습니다:
- 패키지 관리자 콘솔(Package Manager Console)에 다음 명령을 입력합니다:
Install-Package Swashbuckle -Pre
- 또는, project.json 파일에 Swashbuckle 패키지를 추가합니다:
"Swashbuckle": "6.0.0-beta902"
-
- Visual Studio를 사용할 경우:
-
- 솔루션 탐색기(Solution Explorer)에서 마우스 오른쪽 버튼으로 프로젝트를 클릭한 다음, NuGet 패키지 관리(Manage NuGet Packages)를 선택합니다.
- 검색 상자에 Swashbuckle를 입력합니다.
- 시험판 포함(Include Prerelease) 옵션을 체크합니다.
- 패키지 소스(Package Source) 항목을 nuget.org로 설정합니다.
- Swashbuckle 패키지를 선택하고 설치(Install) 버튼을 클릭합니다.
미들웨어에 Swagger를 추가하고 구성하기
패키지 추가를 마쳤으면, ConfigureServices 메서드에서 SwaggerGen을 서비스 컬렉션에 추가한 다음, Configure 메서드에서 생성된 JSON 문서와 SwaggerUI를 제공하기 위한 미들웨어를 활성화시킵니다.
public void ConfigureServices(IServiceCollection services)
{
    // Add framework services.
    services.AddMvc();

    services.AddLogging();

    // Add our repository type
    services.AddSingleton<ITodoRepository, TodoRepository>();

    // Inject an implementation of ISwaggerProvider with defaulted settings applied
    services.AddSwaggerGen();
}

// This method gets called by the runtime. Use this method to configure the HTTP request pipeline.
public void Configure(IApplicationBuilder app, IHostingEnvironment env, ILoggerFactory loggerFactory)
{
    app.UseMvcWithDefaultRoute();

    // Enable middleware to serve generated Swagger as a JSON endpoint
    app.UseSwagger();

    // Enable middleware to serve swagger-ui assets (HTML, JS, CSS etc.)
    app.UseSwaggerUi();
}
이제 Visual Studio에서 컨트롤+F5 키를 눌러서 응용 프로그램을 실행하고, http://localhost:<random_port>/swagger/v1/swagger.json으로 이동해보면 끝점을 기술하는 생성된 문서를 확인할 수 있습니다.
역주
만약, 위의 주소에 접근했을 때 500 오류가 발생한다면, Web API 예제 프로젝트의 TodoController에서 GetAll 액션에 [HttpGet] 어트리뷰트를 적용하고 다시 시도해보시기 바랍니다.
노트
Microsoft Edge, Google Chrome, Firefox는 JSON 문서를 있는 그대로 보여줍니다. 참고로 Chrome에는 문서를 읽기 쉽도록 서식화해주는 확장 기능이 존재합니다. 다음은 그 결과를 간략하게 정리한 예입니다.
{
    "swagger": "2.0",
    "info": {
        "version": "v1",
        "title": "API V1"
    },
    "basePath": "/",
    "paths": {
        "/api/Todo": {
            "get": {
                "tags": [
                    "Todo"
                ],
                "operationId": "ApiTodoGet",
                "consumes": [],
                "produces": [
                    "text/plain",
                    "application/json",
                    "text/json"
                ],
                "responses": {
                    "200": {
                        "description": "OK",
                        "schema": {
                            "type": "array",
                            "items": {
                                "$ref": "#/definitions/TodoItem"
                            }
                        }
                    }
                },
                "deprecated": false
            },
            "post": {
                ...
            }
        },
        "/api/Todo/{id}": {
            "get": {
                ...
            },
            "put": {
                ...
            },
            "delete": {
                ...
            },
            "definitions": {
                "TodoItem": {
                "type": "object",
                "properties": {
                    "key": {
                        "type": "string"
                    },
                    "name": {
                        "type": "string"
                    },
                    "isComplete": {
                        "type": "boolean"
                    }
                }
            }
        },
        "securityDefinitions": {}
    }
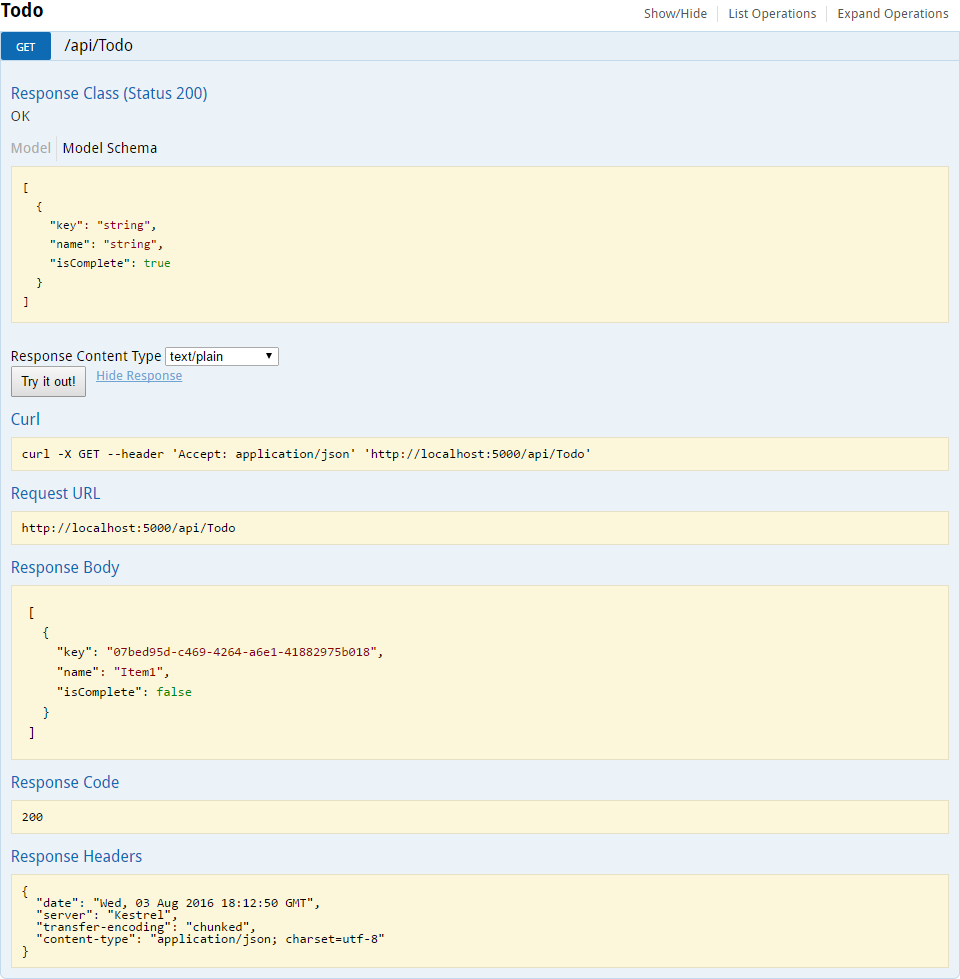
이 문서는 http://localhost:<random_port>/swagger/ui로 이동하면 확인할 수 있는 Swagger UI를 만들어내기 위한 목적으로 사용됩니다.
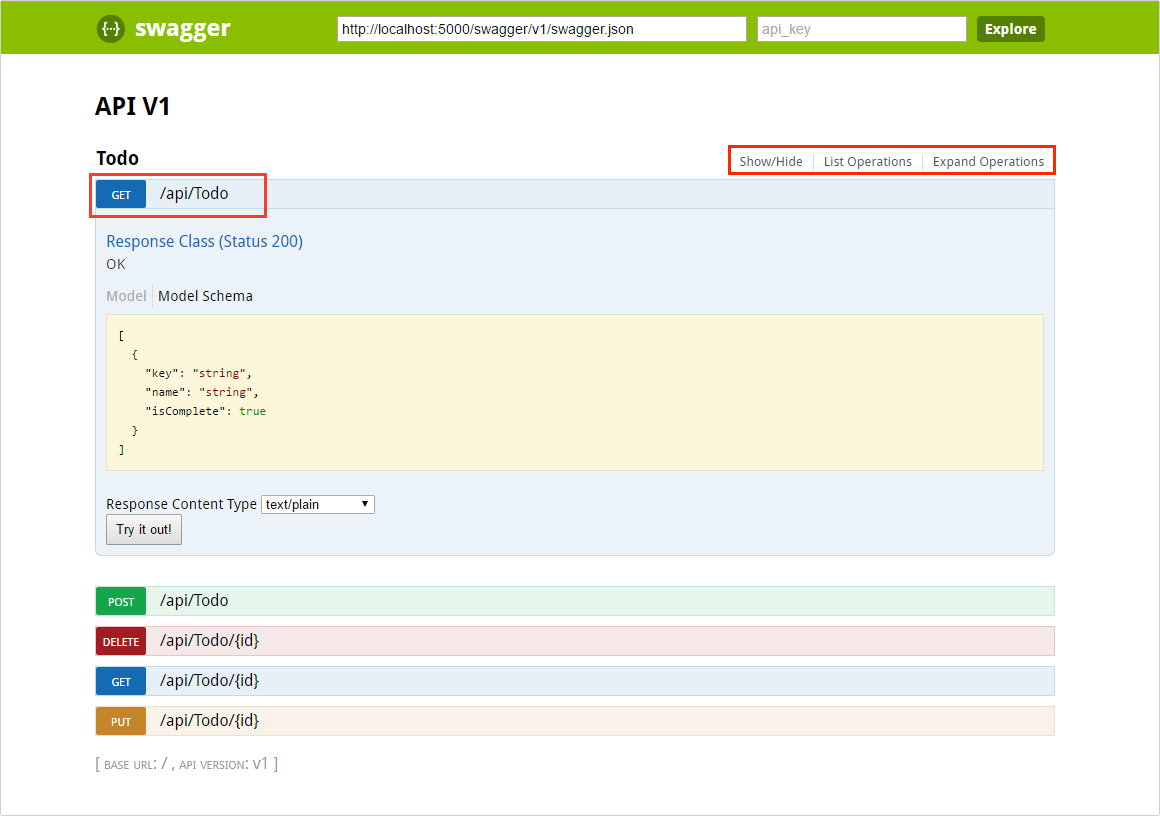
이 UI를 이용해서 ToDo 컨트롤러 내부에 존재하는 각각의 메서드들을 테스트 할 수도 있습니다. 테스트하고자 하는 메서드를 클릭해서 섹션을 확장한 다음, 필요한 매개별수들을 입력하고 "Try it out!" 버튼을 클릭하면 됩니다.
사용자 지정 및 확장성
Swagger는 API를 기술하는 간단한 방법을 제시해줄 뿐만 아니라, 개체 모델의 문서화를 위한 다양한 옵션들을 비롯해서, 룩앤필이나 디자인 언어에 따라 대화형 UI를 사용자 지정할 수 있는 방법까지 제공해줍니다.
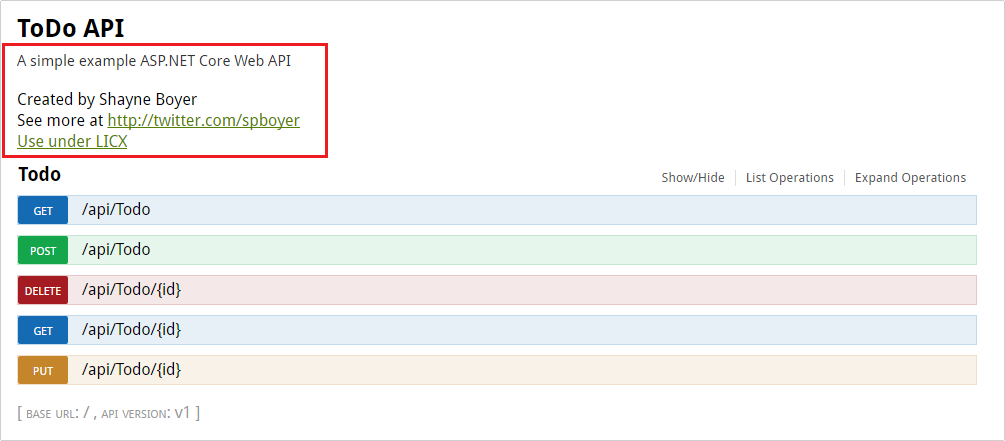
API 정보 및 설명
ConfigureSwaggerGen 메서드를 이용해서 작성자, 라이센스, 설명 같은 정보들을 추가할 수 있습니다.
services.ConfigureSwaggerGen(options =>
{
    options.SingleApiVersion(new Info
    {
        Version = "v1",
        Title = "ToDo API",
        Description = "A simple example ASP.NET Core Web API",
        TermsOfService = "None",
        Contact = new Contact { Name = "Shayne Boyer", Email = "", Url = "http://twitter.com/spboyer"},
        License = new License { Name = "Use under LICX", Url = "http://url.com" }
    });
});
다음 그림은 버전 정보가 추가된 Swagger UI를 보여줍니다.
XML 주석
먼저, Visual Studio에서 마우스 오른쪽 버튼으로 프로젝트를 클릭하고 속성(Properties)을 선택한 다음, 빌드(Build) 탭의 Output 설정 영역에 위치한 XML Documentation file 항목을 체크하면, XML 주석이 활성화됩니다.
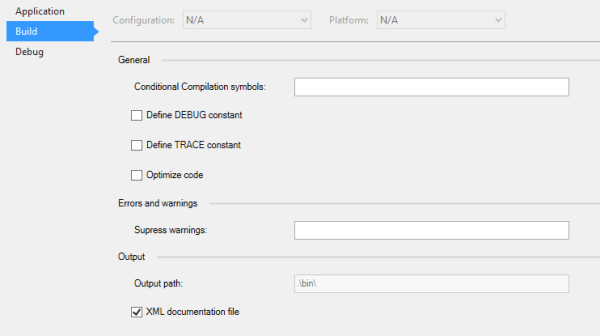
또는, project.json 파일에 "xmlDoc": true 설정을 추가해서 XML 주석을 활성화시킬 수도 있습니다.
"buildOptions": {
    "emitEntryPoint": true,
    "preserveCompilationContext": true,
    "xmlDoc": true
},
그런 다음, Swagger가 생성된 XML 파일을 이용하도록 설정합니다.
노트
Linux 같은 비-Windows 운영 체제에서는 파일명과 경로에서 대소문자를 구분합니다.
따라서 ToDoApi.XML 같은 파일명을 사용할 경우, Windows에서는 문제가 없지만 CentOS 같은 운영 체제에서는 문제가 될 수도 있습니다.
// This method gets called by the runtime. Use this method to add services to the container.
public void ConfigureServices(IServiceCollection services)
{
    // Add framework services.
    services.AddMvc();

    services.AddLogging();

    // Add our repository type.
    services.AddSingleton<ITodoRepository, TodoRepository>();

    // Inject an implementation of ISwaggerProvider with defaulted settings applied.
    services.AddSwaggerGen();

    // Add the detail information for the API.
    services.ConfigureSwaggerGen(options =>
    {
        options.SingleApiVersion(new Info
        {
            Version = "v1",
            Title = "ToDo API",
            Description = "A simple example ASP.NET Core Web API",
            TermsOfService = "None",
            Contact = new Contact { Name = "Shayne Boyer", Email = "", Url = "http://twitter.com/spboyer"},
            License = new License { Name = "Use under LICX", Url = "http://url.com" }
        });

        //Determine base path for the application.
        var basePath = PlatformServices.Default.Application.ApplicationBasePath;

        //Set the comments path for the swagger json and ui.
        options.IncludeXmlComments(basePath + "\\TodoApi.xml");
    });
}

// This method gets called by the runtime. Use this method to configure the HTTP request pipeline.
public void Configure(IApplicationBuilder app, IHostingEnvironment env, ILoggerFactory loggerFactory)
{
    app.UseStaticFiles();

    app.UseMvcWithDefaultRoute();

    // Enable middleware to serve generated Swagger as a JSON endpoint.
    app.UseSwagger();

    // Enable middleware to serve swagger-ui assets (HTML, JS, CSS etc.)
    app.UseSwaggerUi();
}
이 코드에 사용된 ApplicationBasePath 속성은 응용 프로그램의 기본 경로를 반환하며, 이 정보는 XML 주석의 전체 경로를 설정할 때 사용됩니다.
이번 예제에서는 TodoApi.xml이라는 XML 주석 파일을 사용하는데, 이 XML 주석 파일의 이름은 응용 프로그램의 이름을 기반으로 만들어집니다.
이제 다음과 같이 메서드에 슬래시 세 개로 구성된 주석을 추가하고 <summary /> 태그를 작성하면 주석 내용이 Swagger UI의 해당 섹션 헤더에 추가되어 제공됩니다.
/// <summary>
/// Deletes a specific TodoItem.
/// </summary>
/// <param name="id"></param>
[HttpDelete("{id}")]
public void Delete(string id)
{
    TodoItems.Remove(id);
}
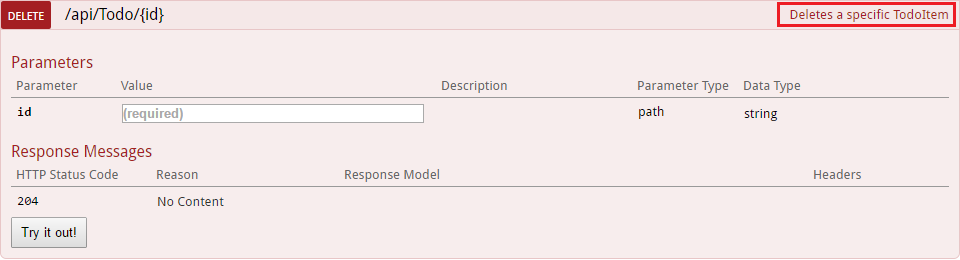
이미 언급했던 것처럼, 이 UI는 생성된 JSON 파일을 기반으로 구성된다는 점에 유의하시기 바랍니다. 따라서 JSON 파일에도 역시 이 주석이 포함됩니다.
"delete": {
    "tags": [
        "Todo"
    ],
    "summary": "Deletes a specific TodoItem",
    "operationId": "ApiTodoByIdDelete",
    "consumes": [],
    "produces": [],
    "parameters": [
        {
            "name": "id",
            "in": "path",
            "description": "",
            "required": true,
            "type": "string"
        }
    ],
    "responses": {
        "204": {
            "description": "No Content"
        }
    },
    "deprecated": false
}
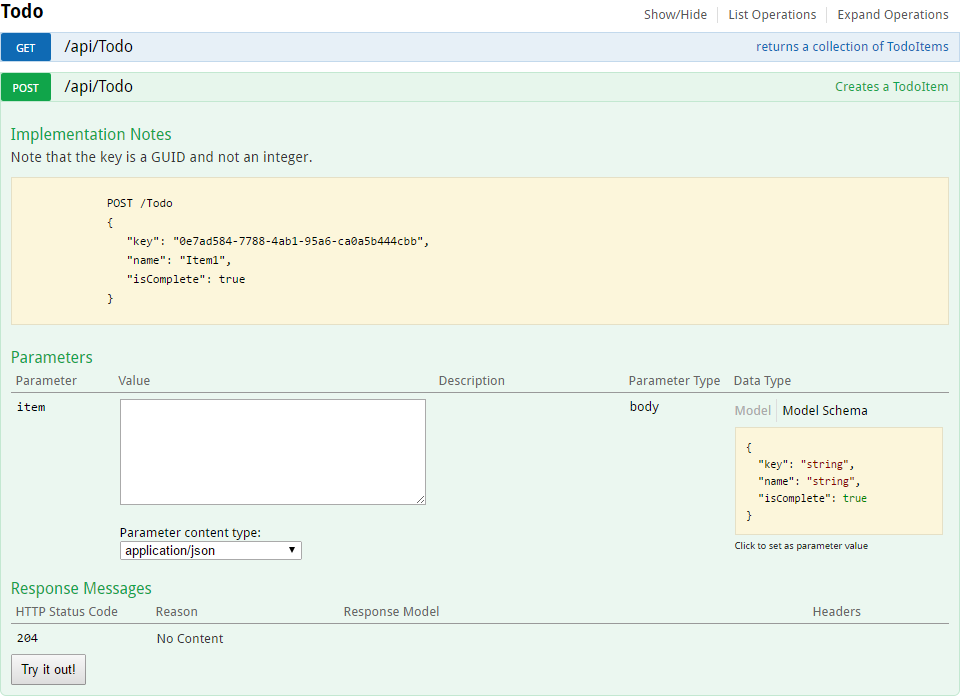
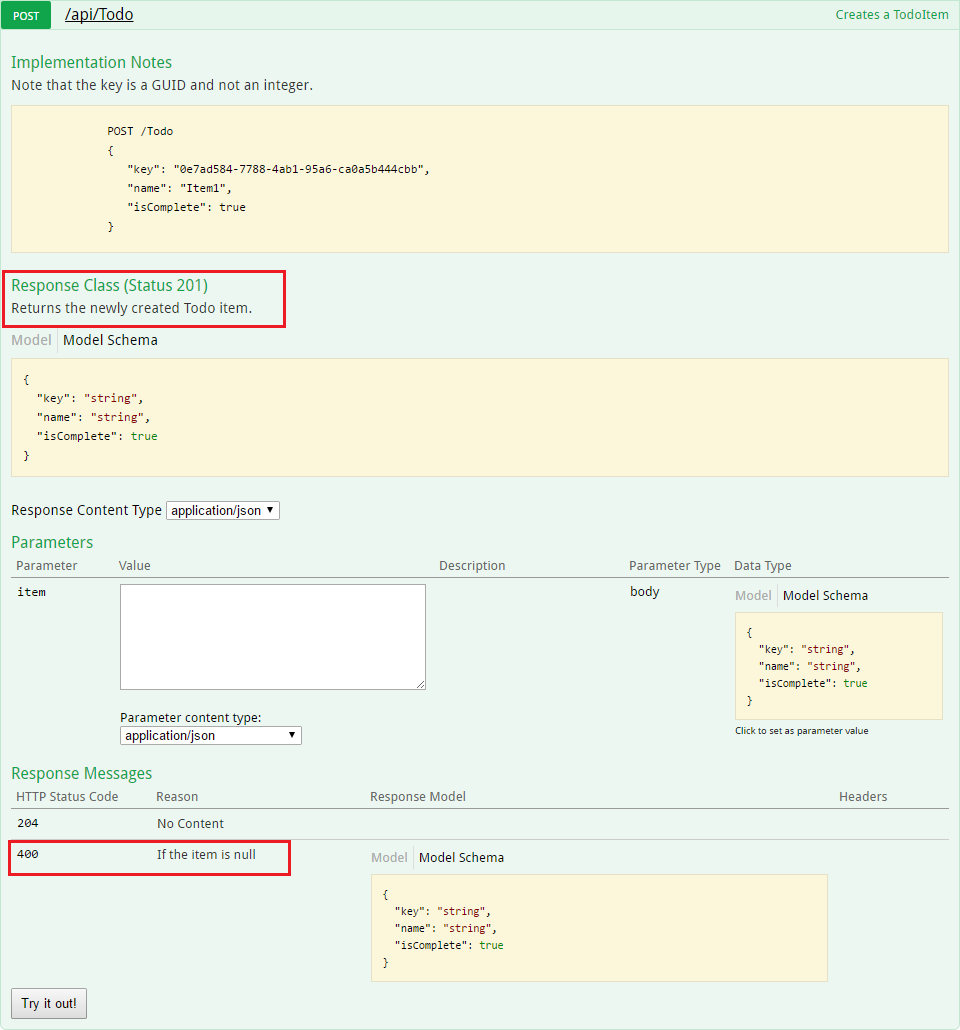
다음은 보다 충실한 내용이 담겨 있는 XML 주석의 예제로, <remarks /> 주석 태그의 콘텐츠로 그냥 단순한 텍스트나 혹는 메서드에 대한 상세한 설명을 위해 JSON 또는 XML 개체를 추가할 수 있습니다.
/// <summary>
/// Creates a TodoItem.
/// </summary>
/// <remarks>
/// Note that the key is a GUID and not an integer.
///
///     POST /Todo
///     {
///        "key": "0e7ad584-7788-4ab1-95a6-ca0a5b444cbb",
///        "name": "Item1",
///        "isComplete": true
///     }
///
/// </remarks>
/// <param name="item"></param>
/// <returns>New Created Todo Item</returns>
/// <response code="201">Returns the newly created item</response>
/// <response code="400">If the item is null</response>
[HttpPost]
[ProducesResponseType(typeof(TodoItem), 201)]
[ProducesResponseType(typeof(TodoItem), 400)]
public IActionResult Create([FromBody, Required] TodoItem item)
{
    if (item == null)
    {
        return BadRequest();
    }
    TodoItems.Add(item);
    return CreatedAtRoute("GetTodo", new { id = item.Key }, item);
}
다음 그림에서 추가된 주석들이 반영된 UI의 개선 사항들을 확인해보시기 바랍니다.
DataAnnotations
API의 컨트롤러나 모델에 System.ComponentModel.DataAnnotations 네임스페이스의 어트리뷰트를 적용해서 Swagger UI 구성 요소의 내용들을 보완할 수도 있습니다.
가령, TodoItem 클래스의 Name 속성에 [Required] 어트리뷰트를 적용하면 UI의 ModelSchema 정보가 변경됩니다.
예제 프로젝트의 코드에 적용된 [Produces("application/json"]이나 RegularExpression 유효성 검사기 등의 어트리뷰트를 적용하면 생성되는 페이지에 보다 자세한 정보가 전달됩니다.
코드에 더 많은 메타데이터가 존재할수록 보다 풍부한 설명이 제공되는 UI 및 API 도움말 페이지가 만들어집니다.
using System;
using System.ComponentModel;
using System.ComponentModel.DataAnnotations;

namespace TodoApi.Models
{
    public class TodoItem
    {
        public string Key { get; set; }
        [Required]
        public string Name { get; set; }
        [DefaultValue(false)]
        public bool IsComplete { get; set; }
    }
}
응답 형식에 대한 정보 제공하기
API를 사용하는 개발자에게는 아마도 구체적인 응답 형식이나 오류 코드(표준 외의) 같은 반환되는 결과값이 가장 중요한 정보일 것입니다. 이 정보는 XML 주석과 DataAnnotations을 사용해서 제공이 가능합니다.
예제 프로젝트의 Create() 메서드를 살펴보면, 이 메서드는 기본적으로 "201 Created" 응답을 반환합니다.
물론, 이 결과는 항목이 실제로 생성된 경우에만 해당되며, POST 본문을 통해서 아무런 데이터도 전달되지 않은 경우에는 "204 No Content"가 반환될 것입니다.
그러나, 이런 사실이나 응답에 관해서 파악할 수 있는 그 밖의 다른 정보들은 어디에서도 제공되지 않습니다.
이 문제점은 다음과 같이 약간의 코드만 추가하면 보완할 수 있습니다.
/// <summary>
/// Creates a TodoItem.
/// </summary>
/// <remarks>
/// Note that the key is a GUID and not an integer.
///
///     POST /Todo
///     {
///        "key": "0e7ad584-7788-4ab1-95a6-ca0a5b444cbb",
///        "name": "Item1",
///        "isComplete": true
///     }
///
/// </remarks>
/// <param name="item"></param>
/// <returns>New Created Todo Item</returns>
/// <response code="201">Returns the newly created item</response>
/// <response code="400">If the item is null</response>
[HttpPost]
[ProducesResponseType(typeof(TodoItem), 201)]
[ProducesResponseType(typeof(TodoItem), 400)]
public IActionResult Create([FromBody, Required] TodoItem item)
{
    if (item == null)
    {
        return BadRequest();
    }
    TodoItems.Add(item);
    return CreatedAtRoute("GetTodo", new { id = item.Key }, item);
}
UI 사용자 지정하기
기본으로 제공되는 UI 자체만으로도 매우 기능적이고 디자인 측면에서도 훌륭하지만, API 관련 문서 페이지들을 구축하면서 브랜드나 룩앤필을 표현하고 싶은 경우도 있을 수 있습니다.
그런 경우, Swashbuckle 구성 요소를 이용하면 간단하게 UI를 사용자 지정할 수 있습니다. 다만 그러기 위해서는 정적 파일을 서비스해야 하기 때문에, 일반적으로 Web API 프로젝트에서는 잘 사용하지 않는 일부 리소스를 추가하고, 정적 파일들을 호스트하기 위한 폴더 구조를 만들어야 합니다.
먼저 프로젝트에 "Microsoft.AspNetCore.StaticFiles": "1.0.0-*" NuGet 패키지를 추가합니다.
그런 다음, 정정 파일 서비스를 위한 미들웨어를 활성화시킵니다.
// This method gets called by the runtime. Use this method to configure the HTTP request pipeline.
public void Configure(IApplicationBuilder app, IHostingEnvironment env, ILoggerFactory loggerFactory)
{
    app.UseStaticFiles();

    app.UseMvcWithDefaultRoute();

    // Enable middleware to serve generated Swagger as a JSON endpoint
    app.UseSwagger();

    // Enable middleware to serve swagger-ui assets (HTML, JS, CSS etc.)
    app.UseSwaggerUi();
}
GitHub 리파지터리에서 Swagger UI 페이지에 사용되는 가장 중요한 index.html 파일을 가져온 다음, wwwroot/swagger/ui 폴더에 복사하고, 이 폴더에 custom.css 파일도 새로 생성합니다.
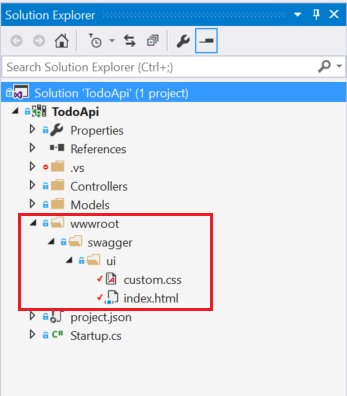
index.html 파일에서 custom.css 파일을 참조합니다.
<link href='custom.css' media='screen' rel='stylesheet' type='text/css' />
다음 CSS는 페이지에 사용자 지정 헤더를 설정하는 간단한 예제를 보여줍니다.
custom.css 파일
.swagger-section #header
{
    border-bottom: 1px solid #000000;
    font-style: normal;
    font-weight: 400;
    font-family: "Segoe UI Light","Segoe WP Light","Segoe UI","Segoe WP",Tahoma,Arial,sans-serif;
    background-color: black;
}

.swagger-section #header h1
{
    text-align: center;
    font-size: 20px;
    color: white;
}
index.html 본문
<body class="swagger-section">
<div id="header">
<h1>ToDo API Documentation</h1>
</div>
<div id="message-bar" class="swagger-ui-wrap" data-sw-translate> </div>
<div id="swagger-ui-container" class="swagger-ui-wrap"></div>
</body>
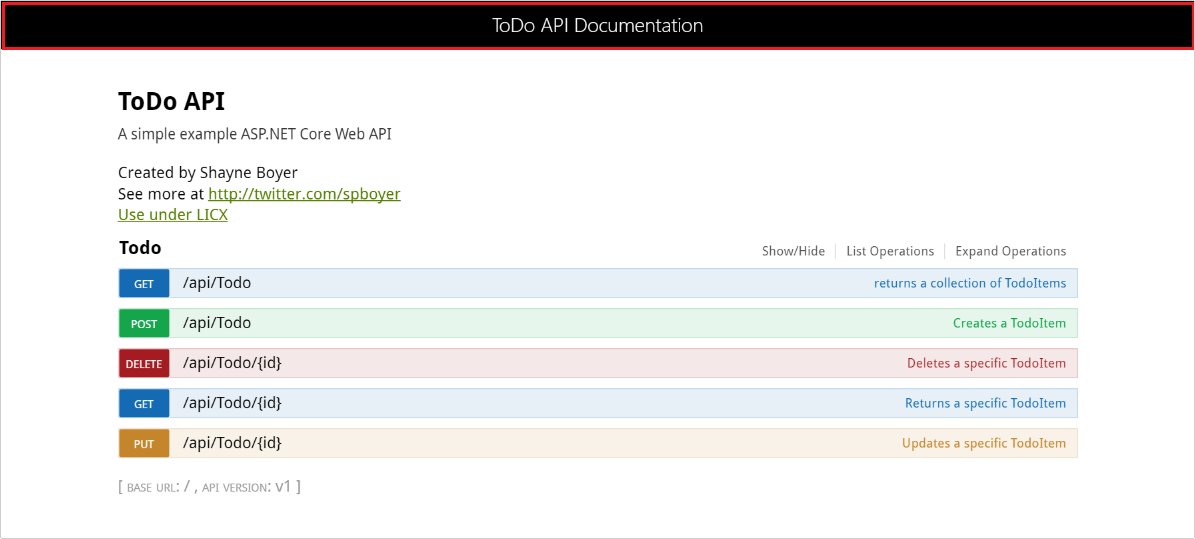
이 페이지를 활용해서 보다 다양한 작업을 처리할 수 있는데, UI 리소스에 대한 전체 기능을 확인하려면 Swagger UI Github 리파지터리를 참고하시기 바랍니다.
- ASP.NET Core MVC와 Visual Studio를 이용한 첫 번째 Web API 구현 2016-07-22 08:00
- Visual Studio로 Azure에 ASP.NET Core 웹 응용 프로그램 배포하기 2016-07-25 08:00
- dotnet watch를 활용한 ASP.NET Core 응용 프로그램 개발 2016-07-29 08:00
- 나노 서버에 ASP.NET Core 응용 프로그램 배포하기 2016-08-01 08:00
- Swagger를 이용한 ASP.NET Web API 도움말 페이지 만들기 2016-09-13 08:00


