
 sign in
 join
join
Face API 시작하기 C# 자습서
- 본 번역문서의 원문은 Getting Started with Face API in C# Tutorial docs.microsoft.com 입니다.
- 본 번역문서는 AI : Face API 시작하기 C# 자습서 www.taeyo.net 에서도 함께 제공됩니다.
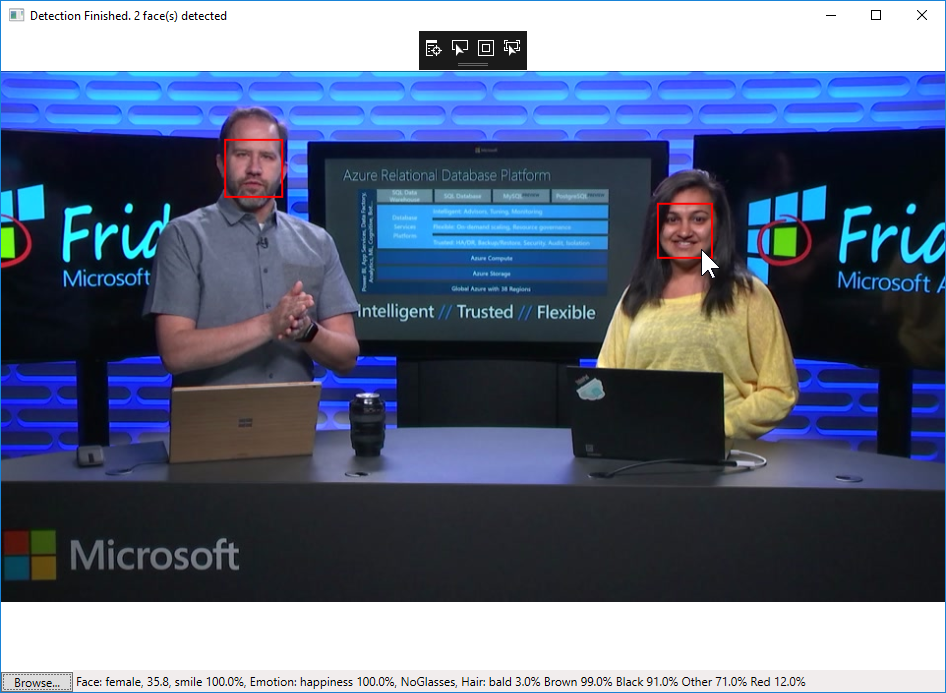
본 자습서에서는 Face API를 사용하는 WPF Windows 응용 프로그램을 구현합니다. 이 예제 응용 프로그램은 이미지로부터 얼굴을 감지한 다음, 감지된 얼굴 주위에 사각형을 그리고, 상태 표시줄에 얼굴에 대한 설명을 출력합니다.
요구 사항
본문의 내용을 살펴보려면 다음 요구 사항을 만족해야 합니다:
- Visual Studio 2015 이상이 설치되어 있어야 합니다.
단계 1: Face API 구독 및 구독 키 발급받기
Face API를 사용하려면 먼저 구독 키를 발급받아야 합니다. 구독 및 구독 키 관리에 관한 세부적인 사항들은 Cognitive Services 체험하기 페이지를 참고하시기 바랍니다. 본 자습서에서는 발급된 기본 키와 보조 키, 모두 사용 가능합니다.
단계 2: Visual Studio 솔루션 생성하기
이번 단계에서는 이미지를 선택하고 표시하는 기본적인 응용 프로그램을 구현하기 위한 Windows WPF 응용 프로그램 프로젝트를 생성합니다. 다음의 지시를 따릅니다:
-
Visual Studio를 실행합니다.
-
파일(File) 메뉴에서 새로 만들기(New)를 클릭한 다음, 프로젝트(Project)를 선택합니다.
-
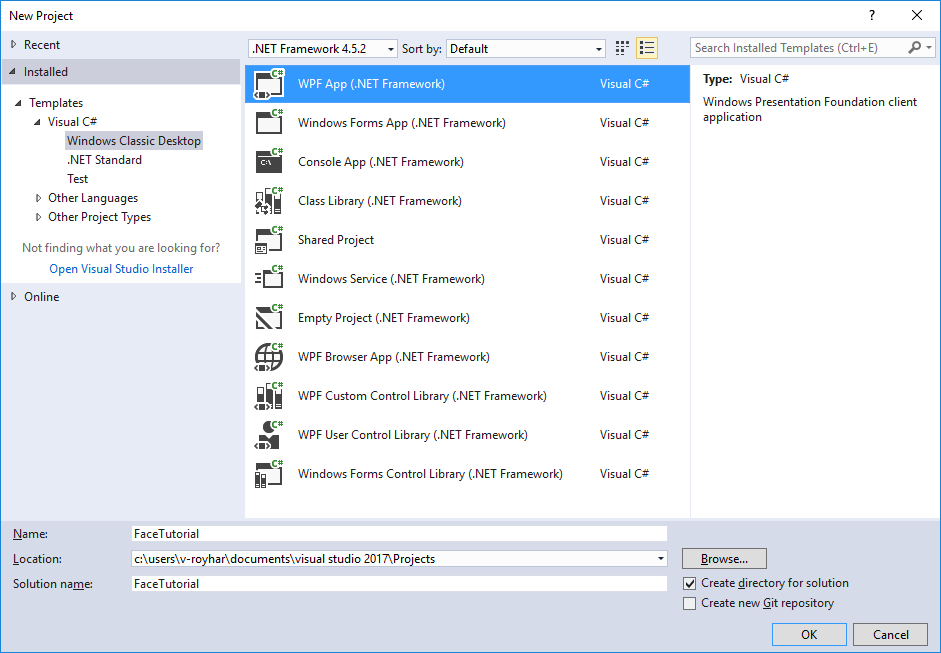
새 프로젝트(New Project) 대화 상자에서 응용 프로그램을 위한 WPF를 선택합니다.
Visual Studio 2015의 경우, 설치됨(Installed) > Templates > Visual C# > Windows 바탕 화면(Windows Desktop)을 확장하고 WPF 응용 프로그램(WPF Application)을 선택합니다.
Visual Studio 2017의 경우, 설치됨(Installed) > Visual C# > Windows 클래식 바탕 화면(Windows Classic Desktop)을 확장하고 WPF 앱(.NET Framework)(WPF App (.NET Framework))을 선택합니다.
-
응용 프로그램의 이름을 FaceTutorial로 지정하고 확인(OK)을 누릅니다.
-
솔루션 탐색기(Solution Explorer)에서 프로젝트를 (본문의 경우 FaceTutorial을) 마우스 오른쪽 버튼으로 클릭한 다음, NuGet 패키지 관리(Manage NuGet Packages)를 클릭합니다.
-
NuGet 패키지 관리자(NuGet Package Manager) 창에서 패키지 소스를 nuget.org로 선택합니다.
-
Newtonsoft.Json 패키지를 검색한 다음, 설치(Install) 버튼을 눌러서 설치합니다. (Visual Studio 2017에서는 먼저 찾아보기(Browse) 탭을 선택한 다음 검색해야 합니다).

단계 3: Face API 클라이언트 라이브러리 구성하기
Face API는 HTTPS REST 요청을 통해서 호출할 수 있는 클라우드 API입니다. .NET 클라이언트 라이브러리는 .NET 응용 프로그램에서 사용 상의 편의성을 높이기 위해 Face API REST 요청을 캡슐화합니다. 본문의 예제에서도 클라이언트 라이브러리를 사용해서 작업을 간소화합니다.
다음 지시에 따라 클라이언트 라이브러리를 구성합니다:
-
솔루션 탐색기(Solution Explorer)에서 프로젝트를 (본문의 경우 FaceTutorial을) 마우스 오른쪽 버튼으로 클릭한 다음, NuGet 패키지 관리(Manage NuGet Packages)를 클릭합니다.
-
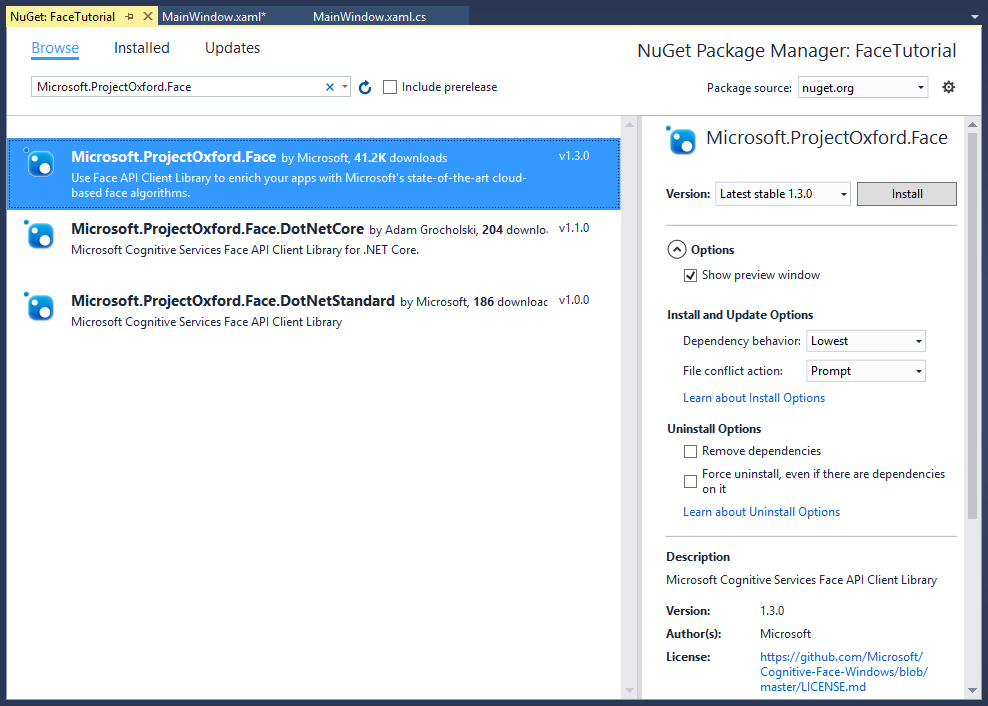
NuGet 패키지 관리자(NuGet Package Manager) 창에서 패키지 소스를 nuget.org로 선택합니다.
-
Microsoft.ProjectOxford.Face 패키지를 검색한 다음, 설치(Install) 버튼을 눌러서 설치합니다. (Visual Studio 2017에서는 먼저 찾아보기(Browse) 탭을 선택한 다음 검색해야 합니다).
-
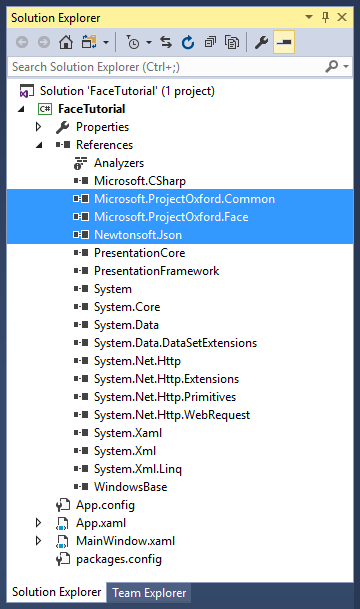
솔루션 탐색기(Solution Explorer)에서 프로젝트의 참조를 확인합니다. 정상적으로 설치된 경우, Microsoft.ProjectOxford.Common, Microsoft.ProjectOxford.Face 및 Newtonsoft.Json에 대한 참조가 자동으로 추가됩니다.
단계 4: 초기화 코드 복사해서 붙여 넣기
-
MainWindow.xaml 파일을 열고 창의 UI를 생성하는 다음 코드로 기존 코드를 대체합니다:
<Window x:Class="FaceTutorial.MainWindow" xmlns="http://schemas.microsoft.com/winfx/2006/xaml/presentation" xmlns:x="http://schemas.microsoft.com/winfx/2006/xaml" Title="MainWindow" Height="700" Width="960"> <Grid x:Name="BackPanel"> <Image x:Name="FacePhoto" Stretch="Uniform" Margin="0,0,0,50" MouseMove="FacePhoto_MouseMove" /> <DockPanel DockPanel.Dock="Bottom"> <Button x:Name="BrowseButton" Width="72" Height="20" VerticalAlignment="Bottom" HorizontalAlignment="Left" Content="Browse..." Click="BrowseButton_Click" /> <StatusBar VerticalAlignment="Bottom"> <StatusBarItem> <TextBlock Name="faceDescriptionStatusBar" /> </StatusBarItem> </StatusBar> </DockPanel> </Grid> </Window> -
MainWindow.xaml.cs 파일을 열고 기존 코드를 다음 코드로 대체합니다:
using System; using System.Collections.Generic; using System.IO; using System.Text; using System.Threading.Tasks; using System.Windows; using System.Windows.Input; using System.Windows.Media; using System.Windows.Media.Imaging; using Microsoft.ProjectOxford.Common.Contract; using Microsoft.ProjectOxford.Face; using Microsoft.ProjectOxford.Face.Contract; namespace FaceTutorial { public partial class MainWindow : Window { // Replace the first parameter with your valid subscription key. // // Replace or verify the region in the second parameter. // // You must use the same region in your REST API call as you used to obtain your subscription keys. // For example, if you obtained your subscription keys from the westus region, replace // "westcentralus" in the URI below with "westus". // // NOTE: Free trial subscription keys are generated in the westcentralus region, so if you are using // a free trial subscription key, you should not need to change this region. private readonly IFaceServiceClient faceServiceClient = new FaceServiceClient("_key_", "https://westcentralus.api.cognitive.microsoft.com/face/v1.0"); Face[] faces; // The list of detected faces. String[] faceDescriptions; // The list of descriptions for the detected faces. double resizeFactor; // The resize factor for the displayed image. public MainWindow() { InitializeComponent(); } // Displays the image and calls Detect Faces. private void BrowseButton_Click(object sender, RoutedEventArgs e) { // Get the image file to scan from the user. var openDlg = new Microsoft.Win32.OpenFileDialog(); openDlg.Filter = "JPEG Image(*.jpg)|*.jpg"; bool? result = openDlg.ShowDialog(this); // Return if canceled. if (!(bool)result) { return; } // Display the image file. string filePath = openDlg.FileName; Uri fileUri = new Uri(filePath); BitmapImage bitmapSource = new BitmapImage(); bitmapSource.BeginInit(); bitmapSource.CacheOption = BitmapCacheOption.None; bitmapSource.UriSource = fileUri; bitmapSource.EndInit(); FacePhoto.Source = bitmapSource; } // Displays the face description when the mouse is over a face rectangle. private void FacePhoto_MouseMove(object sender, MouseEventArgs e) { } } } -
발급받은 구독 키를 입력하고 지역을 확인합니다.
MainWindow.xaml.cs 파일에서 다음 줄을 찾습니다 (28줄과 29줄):
private readonly IFaceServiceClient faceServiceClient =
        new FaceServiceClient("_key_", "https://westcentralus.api.cognitive.microsoft.com/face/v1.0");
첫 번째 매개 변수로 전달되는
_key_를 단계 1에서 발급받은 여러분의 Face API 구독 키로 대체합니다.그리고 구독 키를 발급받은 지역을 사용하고 있는지 두 번째 매개 변수를 확인합니다. 예를 들어서, westus 지역에서 구독 키를 발급받았다면 URI의 "westcentralus"를 "westus"로 변경합니다.
만약 무료 평가판 구독 키를 발급받았다면, 구독 키의 지역은 항상 westcentralus이므로 아무 것도 변경할 필요가 없습니다.
이제 응용 프로그램에서 사진을 찾고 창에 출력할 수 있습니다.

단계 5: 이미지를 업로드해서 얼굴 감지하기
가장 직접적으로 얼굴을 감지하는 방법은 이미지 파일을 직접 업로드해서 Face - Detect API를 호출하는 것입니다. 본문처럼 클라이언트 라이브러리를 사용하는 경우에는 FaceServiceClient의 비동기 메서드인 DetectAsync를 이용해서 해당 작업을 수행할 수 있습니다. 반환된 각각의 얼굴에는 얼굴의 위치를 나타내는 직사각형과 일련의 선택적 얼굴 특징들이 포함됩니다.
다음 코드를 MainWindow 클래스에 추가합니다:
// Uploads the image file and calls Detect Faces.

private async Task<Face[]> UploadAndDetectFaces(string imageFilePath)
{
    // The list of Face attributes to return.
    IEnumerable<FaceAttributeType> faceAttributes =
        new FaceAttributeType[] { FaceAttributeType.Gender, FaceAttributeType.Age, FaceAttributeType.Smile, FaceAttributeType.Emotion, FaceAttributeType.Glasses, FaceAttributeType.Hair };

    // Call the Face API.
    try
    {
        using (Stream imageFileStream = File.OpenRead(imageFilePath))
        {
            Face[] faces = await faceServiceClient.DetectAsync(imageFileStream, returnFaceId: true, returnFaceLandmarks:false, returnFaceAttributes: faceAttributes);
            return faces;
        }
    }
    // Catch and display Face API errors.
    catch (FaceAPIException f)
    {
        MessageBox.Show(f.ErrorMessage, f.ErrorCode);
        return new Face[0];
    }
    // Catch and display all other errors.
    catch (Exception e)
    {
        MessageBox.Show(e.Message, "Error");
        return new Face[0];
    }
}
단계 6: 이미지에 얼굴 표시하기
이번 단계에서는 지금까지 살펴본 단계들을 모두 결합해서 이미지에서 감지된 얼굴을 표시합니다.
MainWindow.xaml.cs 파일의 BrowseButton_Click 이벤트 처리기에 'async' 한정자를 추가합니다:
private async void BrowseButton_Click(object sender, RoutedEventArgs e)BrowseButton_Click 이벤트 처리기의 끝 부분에 다음 코드를 추가합니다:
// Detect any faces in the image.
Title = "Detecting...";
faces = await UploadAndDetectFaces(filePath);
Title = String.Format("Detection Finished. {0} face(s) detected", faces.Length);

if (faces.Length > 0)
{
    // Prepare to draw rectangles around the faces.
    DrawingVisual visual = new DrawingVisual();
    DrawingContext drawingContext = visual.RenderOpen();
    drawingContext.DrawImage(bitmapSource,
        new Rect(0, 0, bitmapSource.Width, bitmapSource.Height));
    double dpi = bitmapSource.DpiX;
    resizeFactor = 96 / dpi;
    faceDescriptions = new String[faces.Length];

    for (int i = 0; i < faces.Length; ++i)
    {
        Face face = faces[i];

        // Draw a rectangle on the face.
        drawingContext.DrawRectangle(
            Brushes.Transparent,
            new Pen(Brushes.Red, 2),
            new Rect(
                face.FaceRectangle.Left * resizeFactor,
                face.FaceRectangle.Top * resizeFactor,
                face.FaceRectangle.Width * resizeFactor,
                face.FaceRectangle.Height * resizeFactor
                )
        );

        // Store the face description.
        faceDescriptions[i] = FaceDescription(face);
    }

    drawingContext.Close();

    // Display the image with the rectangle around the face.
    RenderTargetBitmap faceWithRectBitmap = new RenderTargetBitmap(
        (int)(bitmapSource.PixelWidth * resizeFactor),
        (int)(bitmapSource.PixelHeight * resizeFactor),
        96,
        96,
        PixelFormats.Pbgra32);

    faceWithRectBitmap.Render(visual);
    FacePhoto.Source = faceWithRectBitmap;

    // Set the status bar text.
    faceDescriptionStatusBar.Text = "Place the mouse pointer over a face to see the face description.";
}
단계 7: 이미지의 얼굴 설명하기
이번 단계에서는 Face의 속성들을 확인해서 얼굴을 설명하는 문자열을 생성합니다. 마우스 포인터가 얼굴 사각형 위에 위치해 있을때 이 문자열이 출력되도록 만들 것입니다.
MainWindow 클래스에 얼굴의 세부 정보를 문자열로 변환하는 다음 메서드를 추가합니다:
// Returns a string that describes the given face.

private string FaceDescription(Face face)
{
    StringBuilder sb = new StringBuilder();

    sb.Append("Face: ");

    // Add the gender, age, and smile.
    sb.Append(face.FaceAttributes.Gender);
    sb.Append(", ");
    sb.Append(face.FaceAttributes.Age);
    sb.Append(", ");
    sb.Append(String.Format("smile {0:F1}%, ", face.FaceAttributes.Smile * 100));

    // Add the emotions. Display all emotions over 10%.
    sb.Append("Emotion: ");
    EmotionScores emotionScores = face.FaceAttributes.Emotion;
    if (emotionScores.Anger     >= 0.1f) sb.Append(String.Format("anger {0:F1}%, ",     emotionScores.Anger * 100));
    if (emotionScores.Contempt  >= 0.1f) sb.Append(String.Format("contempt {0:F1}%, ",  emotionScores.Contempt * 100));
    if (emotionScores.Disgust   >= 0.1f) sb.Append(String.Format("disgust {0:F1}%, ",   emotionScores.Disgust * 100));
    if (emotionScores.Fear      >= 0.1f) sb.Append(String.Format("fear {0:F1}%, ",      emotionScores.Fear * 100));
    if (emotionScores.Happiness >= 0.1f) sb.Append(String.Format("happiness {0:F1}%, ", emotionScores.Happiness * 100));
    if (emotionScores.Neutral   >= 0.1f) sb.Append(String.Format("neutral {0:F1}%, ",   emotionScores.Neutral * 100));
    if (emotionScores.Sadness   >= 0.1f) sb.Append(String.Format("sadness {0:F1}%, ",   emotionScores.Sadness * 100));
    if (emotionScores.Surprise  >= 0.1f) sb.Append(String.Format("surprise {0:F1}%, ",  emotionScores.Surprise * 100));

    // Add glasses.
    sb.Append(face.FaceAttributes.Glasses);
    sb.Append(", ");

    // Add hair.
    sb.Append("Hair: ");

    // Display baldness confidence if over 1%.
    if (face.FaceAttributes.Hair.Bald >= 0.01f)
        sb.Append(String.Format("bald {0:F1}% ", face.FaceAttributes.Hair.Bald * 100));

    // Display all hair color attributes over 10%.
    HairColor[] hairColors = face.FaceAttributes.Hair.HairColor;
    foreach (HairColor hairColor in hairColors)
    {
        if (hairColor.Confidence >= 0.1f)
        {
            sb.Append(hairColor.Color.ToString());
            sb.Append(String.Format(" {0:F1}% ", hairColor.Confidence * 100));
        }
    }

    // Return the built string.
    return sb.ToString();
}
단계 8: 얼굴 설명 출력하기
다음 코드로 FacePhoto_MouseMove 이벤트 처리기의 내용을 대체합니다:
private void FacePhoto_MouseMove(object sender, MouseEventArgs e)
{
    // If the REST call has not completed, return from this method.
    if (faces == null)
        return;

    // Find the mouse position relative to the image.
    Point mouseXY = e.GetPosition(FacePhoto);

    ImageSource imageSource = FacePhoto.Source;
    BitmapSource bitmapSource = (BitmapSource)imageSource;

    // Scale adjustment between the actual size and displayed size.
    var scale = FacePhoto.ActualWidth / (bitmapSource.PixelWidth / resizeFactor);

    // Check if this mouse position is over a face rectangle.
    bool mouseOverFace = false;

    for (int i = 0; i < faces.Length; ++i)
    {
        FaceRectangle fr = faces[i].FaceRectangle;
        double left = fr.Left * scale;
        double top = fr.Top * scale;
        double width = fr.Width * scale;
        double height = fr.Height * scale;

        // Display the face description for this face if the mouse is over this face rectangle.
        if (mouseXY.X >= left && mouseXY.X <= left + width && mouseXY.Y >= top && mouseXY.Y <= top + height)
        {
            faceDescriptionStatusBar.Text = faceDescriptions[i];
            mouseOverFace = true;
            break;
        }
    }

    // If the mouse is not over a face rectangle.
    if (!mouseOverFace)
        faceDescriptionStatusBar.Text = "Place the mouse pointer over a face to see the face description.";
}
이제 예제 응용 프로그램을 실행한 다음, 얼굴이 포함된 이미지를 찾아서 선택합니다. 그리고 클라우드 API가 응답할 때까지 잠시 대기합니다. 결과가 반환되고 나면 이미지에 포함된 얼굴에 빨간색 직사각형이 출력되는 것을 확인할 수 있습니다. 이 얼굴 사각형 위로 마우스를 움직이면 상태 표시줄에 그 얼굴에 대한 설명이 출력됩니다:
요약
본문에서는 Face API를 사용하기 위해 필요한 기본적인 과정을 알아보고 이미지에 얼굴을 표시하는 응용 프로그램을 구현했습니다. Face API에 관한 더 자세한 내용은 퀵 스타트 문서 및 API 참조를 참고하시기 바랍니다.
전체 소스
WPF Windows 응용 프로그램의 전체 소스는 다음과 같습니다.
MainWindow.xaml:
<Window x:Class="FaceTutorial.MainWindow"
         xmlns="http://schemas.microsoft.com/winfx/2006/xaml/presentation"
         xmlns:x="http://schemas.microsoft.com/winfx/2006/xaml"
         Title="MainWindow" Height="700" Width="960">
    <Grid x:Name="BackPanel">
        <Image x:Name="FacePhoto" Stretch="Uniform" Margin="0,0,0,50" MouseMove="FacePhoto_MouseMove" />
        <DockPanel DockPanel.Dock="Bottom">
            <Button x:Name="BrowseButton" Width="72" Height="20" VerticalAlignment="Bottom" HorizontalAlignment="Left"
                     Content="Browse..."
                     Click="BrowseButton_Click" />
            <StatusBar VerticalAlignment="Bottom">
                <StatusBarItem>
                    <TextBlock Name="faceDescriptionStatusBar" />
                </StatusBarItem>
            </StatusBar>
        </DockPanel>
    </Grid>
</Window>
MainWindow.xaml.cs:
using System;
using System.Collections.Generic;
using System.IO;
using System.Text;
using System.Threading.Tasks;
using System.Windows;
using System.Windows.Input;
using System.Windows.Media;
using System.Windows.Media.Imaging;
using Microsoft.ProjectOxford.Common.Contract;
using Microsoft.ProjectOxford.Face;
using Microsoft.ProjectOxford.Face.Contract;

namespace FaceTutorial
{
    public partial class MainWindow : Window
    {
        // Replace the first parameter with your valid subscription key.
        //
        // Replace or verify the region in the second parameter.
        //
        // You must use the same region in your REST API call as you used to obtain your subscription keys.
        // For example, if you obtained your subscription keys from the westus region, replace
        // "westcentralus" in the URI below with "westus".
        //
        // NOTE: Free trial subscription keys are generated in the westcentralus region, so if you are using
        // a free trial subscription key, you should not need to change this region.
        private readonly IFaceServiceClient faceServiceClient =
            new FaceServiceClient("7ab0aa443a5d4b83a017a438418f21de", "https://westcentralus.api.cognitive.microsoft.com/face/v1.0");

        Face[] faces;                   // The list of detected faces.
        String[] faceDescriptions;      // The list of descriptions for the detected faces.
        double resizeFactor;            // The resize factor for the displayed image.

        public MainWindow()
        {
            InitializeComponent();
        }

        // Displays the image and calls Detect Faces.

        private async void BrowseButton_Click(object sender, RoutedEventArgs e)
        {
            // Get the image file to scan from the user.
            var openDlg = new Microsoft.Win32.OpenFileDialog();

            openDlg.Filter = "JPEG Image(*.jpg)|*.jpg";
            bool? result = openDlg.ShowDialog(this);

            // Return if canceled.
            if (!(bool)result)
            {
                return;
            }

            // Display the image file.
            string filePath = openDlg.FileName;

            Uri fileUri = new Uri(filePath);
            BitmapImage bitmapSource = new BitmapImage();

            bitmapSource.BeginInit();
            bitmapSource.CacheOption = BitmapCacheOption.None;
            bitmapSource.UriSource = fileUri;
            bitmapSource.EndInit();

            FacePhoto.Source = bitmapSource;

            // Detect any faces in the image.
            Title = "Detecting...";
            faces = await UploadAndDetectFaces(filePath);
            Title = String.Format("Detection Finished. {0} face(s) detected", faces.Length);

            if (faces.Length > 0)
            {
                // Prepare to draw rectangles around the faces.
                DrawingVisual visual = new DrawingVisual();
                DrawingContext drawingContext = visual.RenderOpen();
                drawingContext.DrawImage(bitmapSource,
                    new Rect(0, 0, bitmapSource.Width, bitmapSource.Height));
                double dpi = bitmapSource.DpiX;
                resizeFactor = 96 / dpi;
                faceDescriptions = new String[faces.Length];

                for (int i = 0; i < faces.Length; ++i)
                {
                    Face face = faces[i];

                    // Draw a rectangle on the face.
                    drawingContext.DrawRectangle(
                        Brushes.Transparent,
                        new Pen(Brushes.Red, 2),
                        new Rect(
                            face.FaceRectangle.Left * resizeFactor,
                            face.FaceRectangle.Top * resizeFactor,
                            face.FaceRectangle.Width * resizeFactor,
                            face.FaceRectangle.Height * resizeFactor
                            )
                    );

                    // Store the face description.
                    faceDescriptions[i] = FaceDescription(face);
                }

                drawingContext.Close();

                // Display the image with the rectangle around the face.
                RenderTargetBitmap faceWithRectBitmap = new RenderTargetBitmap(
                    (int)(bitmapSource.PixelWidth * resizeFactor),
                    (int)(bitmapSource.PixelHeight * resizeFactor),
                    96,
                    96,
                    PixelFormats.Pbgra32);

                faceWithRectBitmap.Render(visual);
                FacePhoto.Source = faceWithRectBitmap;

                // Set the status bar text.
                faceDescriptionStatusBar.Text = "Place the mouse pointer over a face to see the face description.";
            }
        }

        // Displays the face description when the mouse is over a face rectangle.

        private void FacePhoto_MouseMove(object sender, MouseEventArgs e)
        {
            // If the REST call has not completed, return from this method.
            if (faces == null)
                return;

            // Find the mouse position relative to the image.
            Point mouseXY = e.GetPosition(FacePhoto);

            ImageSource imageSource = FacePhoto.Source;
            BitmapSource bitmapSource = (BitmapSource)imageSource;

            // Scale adjustment between the actual size and displayed size.
            var scale = FacePhoto.ActualWidth / (bitmapSource.PixelWidth / resizeFactor);

            // Check if this mouse position is over a face rectangle.
            bool mouseOverFace = false;

            for (int i = 0; i < faces.Length; ++i)
            {
                FaceRectangle fr = faces[i].FaceRectangle;
                double left = fr.Left * scale;
                double top = fr.Top * scale;
                double width = fr.Width * scale;
                double height = fr.Height * scale;

                // Display the face description for this face if the mouse is over this face rectangle.
                if (mouseXY.X >= left && mouseXY.X <= left + width && mouseXY.Y >= top && mouseXY.Y <= top + height)
                {
                    faceDescriptionStatusBar.Text = faceDescriptions[i];
                    mouseOverFace = true;
                    break;
                }
            }

            // If the mouse is not over a face rectangle.
            if (!mouseOverFace)
                faceDescriptionStatusBar.Text = "Place the mouse pointer over a face to see the face description.";
        }

        // Uploads the image file and calls Detect Faces.

        private async Task<Face[]> UploadAndDetectFaces(string imageFilePath)
        {
            // The list of Face attributes to return.
            IEnumerable<FaceAttributeType> faceAttributes =
                new FaceAttributeType[] { FaceAttributeType.Gender, FaceAttributeType.Age, FaceAttributeType.Smile, FaceAttributeType.Emotion, FaceAttributeType.Glasses, FaceAttributeType.Hair };

            // Call the Face API.
            try
            {
                using (Stream imageFileStream = File.OpenRead(imageFilePath))
                {
                    Face[] faces = await faceServiceClient.DetectAsync(imageFileStream, returnFaceId: true, returnFaceLandmarks: false, returnFaceAttributes: faceAttributes);
                    return faces;
                }
            }
            // Catch and display Face API errors.
            catch (FaceAPIException f)
            {
                MessageBox.Show(f.ErrorMessage, f.ErrorCode);
                return new Face[0];
            }
            // Catch and display all other errors.
            catch (Exception e)
            {
                MessageBox.Show(e.Message, "Error");
                return new Face[0];
            }
        }

        // Returns a string that describes the given face.

        private string FaceDescription(Face face)
        {
            StringBuilder sb = new StringBuilder();

            sb.Append("Face: ");

            // Add the gender, age, and smile.
            sb.Append(face.FaceAttributes.Gender);
            sb.Append(", ");
            sb.Append(face.FaceAttributes.Age);
            sb.Append(", ");
            sb.Append(String.Format("smile {0:F1}%, ", face.FaceAttributes.Smile * 100));

            // Add the emotions. Display all emotions over 10%.
            sb.Append("Emotion: ");
            EmotionScores emotionScores = face.FaceAttributes.Emotion;
            if (emotionScores.Anger >= 0.1f) sb.Append(String.Format("anger {0:F1}%, ", emotionScores.Anger * 100));
            if (emotionScores.Contempt >= 0.1f) sb.Append(String.Format("contempt {0:F1}%, ", emotionScores.Contempt * 100));
            if (emotionScores.Disgust >= 0.1f) sb.Append(String.Format("disgust {0:F1}%, ", emotionScores.Disgust * 100));
            if (emotionScores.Fear >= 0.1f) sb.Append(String.Format("fear {0:F1}%, ", emotionScores.Fear * 100));
            if (emotionScores.Happiness >= 0.1f) sb.Append(String.Format("happiness {0:F1}%, ", emotionScores.Happiness * 100));
            if (emotionScores.Neutral >= 0.1f) sb.Append(String.Format("neutral {0:F1}%, ", emotionScores.Neutral * 100));
            if (emotionScores.Sadness >= 0.1f) sb.Append(String.Format("sadness {0:F1}%, ", emotionScores.Sadness * 100));
            if (emotionScores.Surprise >= 0.1f) sb.Append(String.Format("surprise {0:F1}%, ", emotionScores.Surprise * 100));

            // Add glasses.
            sb.Append(face.FaceAttributes.Glasses);
            sb.Append(", ");

            // Add hair.
            sb.Append("Hair: ");

            // Display baldness confidence if over 1%.
            if (face.FaceAttributes.Hair.Bald >= 0.01f)
                sb.Append(String.Format("bald {0:F1}% ", face.FaceAttributes.Hair.Bald * 100));

            // Display all hair color attributes over 10%.
            HairColor[] hairColors = face.FaceAttributes.Hair.HairColor;
            foreach (HairColor hairColor in hairColors)
            {
                if (hairColor.Confidence >= 0.1f)
                {
                    sb.Append(hairColor.Color.ToString());
                    sb.Append(String.Format(" {0:F1}% ", hairColor.Confidence * 100));
                }
            }

            // Return the built string.
            return sb.ToString();
        }
    }
}
관련 자료
- Face API 2017-12-05 08:00
- 이미지에서 얼굴 감지하기 2017-12-07 08:00
- 이미지의 얼굴 식별하기 2017-12-12 08:00
- 얼굴을 대량으로 추가하는 방법 2017-12-14 08:00
- Face API cURL 퀵 스타트 2017-12-19 08:00
- Face API C# 퀵 스타트 2017-12-21 08:00
- Face API Java 퀵 스타트 2017-12-26 08:00
- Face API JavaScript 퀵 스타트 2017-12-28 08:00
- Face API 시작하기 C# 자습서 2018-01-02 08:00
- Face API 시작하기 Android Java 자습서 2018-01-04 08:00


